Can I Replace the Wheels on My Samsonite Luggage
Yes — you can usually replace the wheels on your Samsonite yourself or through a repair shop, but first check whether the wheels are detachable, riveted, or clipped and inspect the axle and housing for damage. Measure diameter, width and axle size, source OEM or compatible third‑party parts, and decide if repair cost is worth it compared with replacing the bag. With the right tools and parts you can swap wheels, and the steps, tips, and pitfalls are explained below.
Can You Replace Samsonite Wheels? Quick Checklist?
Wondering if you can replace Samsonite wheels? You can, but first check four things: wheel type (detachable vs. riveted), matching replacement availability, condition of the axle/housing, and tool access.
Measure wheel diameter and axle size, inspect mounting for rust or damage, and confirm warranty status.
If parts match and mounting’s sound, you’ll likely replace wheels successfully with basic tools.
When Is Repair Worth It vs. Buying New?
If you’re weighing whether to repair your Samsonite or buy a new one, compare repair cost, remaining suitcase life, and how often you travel.
If wheel replacement is under 30–40% of a replacement bag and the shell is sound, repair it.
If fabric, frame, or multiple components fail or you rarely travel, replacement often gives better value and warranty peace of mind.
Which Samsonite Models Have Removable Wheels?
Which Samsonite models let you swap out wheels without tearing the bag apart?
You’ll mainly find removable wheels on newer hard-shell collections and select spinner lines—Cosmolite, Proxis, and certain Winfield/Omni models often use screw-on or modular wheel assemblies.
Check your model’s underside and owner manual; visible screws or a quick-release plate mean you can replace wheels yourself or with minimal repair-shop help.
Does Samsonite Warranty Cover Wheel Damage?
Does Samsonite’s warranty cover wheel damage? It depends on your model and the cause.
Manufacturer defects are often covered under warranty, but damage from wear, misuse, or accidents typically isn’t.
Check your specific warranty terms, proof of purchase, and warranty period.
Contact Samsonite customer service for inspection guidance and authorized repair or replacement options before attempting DIY fixes to avoid voiding coverage.
How to Identify Wheel Mounting Types: Axle, Rivet, Clip
Wondering how your suitcase wheels are attached? Inspect mounting points: axles show a visible threaded rod or bolt passing through the wheel; rivets are dome-headed metal fasteners permanently compressed, no removable screw; clips use plastic or metal retainers you can pry off.
Check inside wheel housing or under a cover for fastener type so you know which removal method to use.
How to Tell If a Wheel Is Repairable or Fused
Before you start disassembling, check whether the wheel spins freely, wobbles, or stays locked in place—those behaviors tell you if it’s repairable or fused. If it spins with slight play, you can often clean and lubricate. If it’s seized or plastic is cracked, replacement’s likely. Use this quick reference:
| Symptom | Likely Cause | Action |
|---|---|---|
| Spins freely | Minor debris | Clean/lubricate |
| Wobbles | Worn bearing | Tighten/replace bearing |
| Locked | Corrosion/crack | Replace wheel |
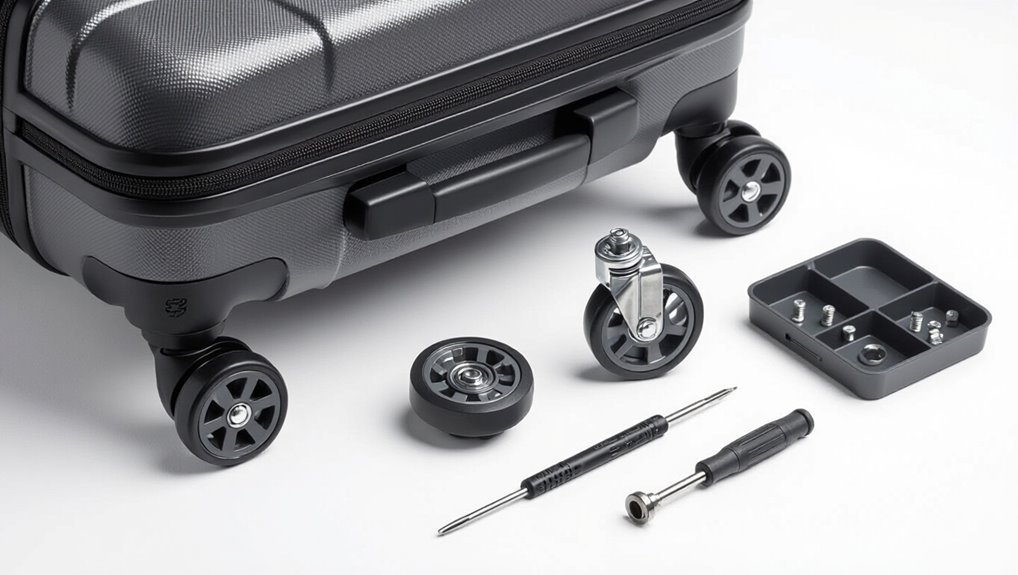
Tools You Need for a Samsonite Wheel Swap
You’ll need a small set of basic hand tools and a few extras to swap Samsonite wheels reliably.
Gather quality bits and a pry tool, plus replacement wheels and fasteners. Keep parts organized.
- Screwdrivers (Phillips/flat) and hex bits
- Needle-nose pliers, small adjustable wrench
- Plastic pry tool, cloth, thread locker
How to Remove Clutch or Cover Plate (Spinner Cases)
Start by finding the cover plate on the spinner—it’s usually a circular or rectangular piece around the wheel hub.
You’ll remove any visible screws or pry off the plate gently with a flat screwdriver or spudger to expose the clutch assembly.
Once the plate’s off, unfasten the clutch components to free the wheel for replacement.
Locating The Cover Plate
Locate the spinner’s cover plate by flipping the case onto its back and inspecting the wheel housing area—you’re looking for a small, often circular or oval plastic cap near the wheel axle that conceals the clutch or fastener.
- Check both inner and outer wheel housings for matching caps.
- Feel for a press-fit or snap edge you can pry gently.
- Note any screws or slots before attempting removal.
Removing The Clutch Assembly
Carefully pry off the cover plate or clutch cap using a thin flathead screwdriver or a plastic spudger, working around the edge to release any press-fit tabs while watching for hidden screws.
Once removed, unplug or de-clip the clutch assembly from the wheel hub, note orientation, then remove retaining screws or bolts.
Keep parts organized and photograph their positions for accurate reassembly later.
How to Remove a Screwed‑On Wheel Assembly
You’ll need a small set of tools—typically a Phillips screwdriver, needle‑nose pliers, and possibly a hex key—before you start.
First, use the screwdriver to remove the visible screw(s) holding the wheel to the axle, keeping track of any washers or spacers.
Then pull the wheel straight off the axle (use pliers if it’s tight) and set the components aside for reassembly.
Tools Needed
Before you start, gather a small set of tools so you can quickly remove a screwed-on wheel assembly: a Phillips and flathead screwdriver, a set of small sockets or a nut driver (check the axle nut size), needle-nose pliers, and a thin putty knife or pry tool to lift trim without damage.
- Match socket/nut driver to axle.
- Use screwdrivers for fasteners.
- Pliers hold small parts.
Removing The Wheel
Once you’ve got your tools ready, flip the suitcase onto a soft surface so the wheel housing faces up and won’t scrape.
Remove any wheel cover or cap with a flat tool, then hold the axle and unscrew the retaining bolt with the correct driver.
Slide the wheel off, noting spacers and washers’ order.
Keep fasteners safe for reassembly.
How to Remove a Riveted Wheel Assembly
Start by getting a clear view of the riveted wheel assembly and the tools you’ll need: a center punch, hammer, drill with a metal bit slightly smaller than the rivet shaft, and safety goggles.
Begin by inspecting the riveted wheel assembly and gathering safety gear: center punch, hammer, drill, and goggles.
- Center-punch the rivet head, then tap to create a drilling guide.
- Drill the rivet carefully until the head loosens.
- Remove the head, push out the remaining shaft, clean the hole, and prepare for replacement.
How to Extract a Stuck Axle or Bushing
After you’ve removed the rivet head and cleared the hole, you’ll often find the axle or bushing stuck from corrosion or grime.
You’ll need the right tools and a careful approach to extract it without widening or damaging the mounting hole.
Apply penetrating oil, let it soak, then use a proper-size punch and a hammer or a slide hammer for straight, controlled blows.
Work gradually and reapply oil as needed.
How to Swage or Replace Rivets Correctly
Once you’ve removed the wheel assembly, you’ll need to remove the old rivet without damaging the surrounding shell or axle.
Use a center punch and drill bit sized to the rivet head, then ream or peen the tail to clear the hole before fitting a new rivet.
When installing, swage the new rivet evenly with a proper tool so it seats flush and spins freely without play.
Proper Rivet Removal
Because the rivets secure the wheel assembly, you’ll need the right tools and technique to remove or swage them without damaging the shell, axle, or new hardware.
- Inspect rivet type and access; gather drill, punch, pliers.
- Stabilize shell and drill center slowly, backing out mandrel cleanly.
- Remove leftover shank, deburr hole, and test fit new rivet or bolt before final swage.
Correct Swaging Technique
With the hole prepared and the new fastener test-fitted, you’re ready to swage or replace the rivet properly to secure the wheel assembly.
Position the rivet head squarely, use a matching swage tool or rivet gun, and support the opposite side with anvil or bucking bar.
Apply steady, controlled blows until the tail flares and seats.
Inspect alignment and spin wheel for smooth operation.
How to Remove and Replace the Wheel Housing
Start by flipping your Samsonite so you can access the wheel housing comfortably; you’ll need a clear workspace and the right screwdriver.
- Remove screws securing the housing, keep them organized.
- Pry housing gently, detach wheel assembly and bearings, note orientation.
- Fit new housing, reattach bearings and wheel, tighten screws evenly and test rotation.
How to Measure Wheel Diameter, Width, and Axle Length
Measuring the wheels correctly guarantees your replacement parts fit and the suitcase rolls smoothly.
Use a caliper or ruler: measure wheel diameter across the widest point, record width (thickness) at the tread, and note axle length from end to end including any flanges.
Measure with wheel mounted if possible to include housing spacing, and jot measurements in millimeters for accuracy.
How to Read Samsonite Model Numbers for Parts
When you’re hunting for replacement parts, decoding the Samsonite model number tells you exactly which components fit your bag.
Check the tag or label for the model/PN code, note letters indicating series, and record numeric codes for size.
Then:
- Match series letters to product line.
- Use numeric codes for style/size.
- Verify color/finish codes before ordering.
How to Identify Axle Thread Specs and Lengths
Once you’ve matched the model number to the correct series and size, you’ll need to identify the axle thread specs and lengths so replacement wheels fit and run true.
Measure thread diameter with a caliper, note pitch (threads per inch or metric), and record overall shaft length plus any shoulder or stepped sections.
Compare to manufacturer specs or bring measurements when ordering replacements.
Spinner vs. Inline Wheels: Which to Choose?
You’ll notice spinners give you effortless maneuverability in crowded airports and tight aisles, letting you roll the bag beside you or push it ahead with minimal effort.
Inline wheels sacrifice some agility but offer tougher construction and better shock handling on rough surfaces, so they last longer on uneven trips.
Think about where you travel most and which trait—mobility or durability—matters more before you replace the wheels.
Spinner Mobility Compared
Although both spinner and inline wheels get your bag around the airport, they do it in very different ways, so you’ll want to match wheel type to how you travel.
Spinners offer smooth, maneuverable steering; inlines roll straight and track better.
- Spinners: pivot, easy in crowds.
- Inlines: pull-behind stability.
- Choose based on control and packing style.
Inline Durability Benefits
Consider inline wheels when you want longevity and fewer repairs: their recessed, fixed design protects bearings and housings from knocks, dirt, and rough surfaces, so they tend to withstand heavy loads and frequent travel better than exposed spinner casters.
You’ll get fewer wheel replacements, simpler maintenance, and steadier tracking on uneven terrain, though you’ll sacrifice some maneuverability in tight spaces.
What Wheel Diameter and Width Mean for Fit
Wheel size matters because diameter and width determine whether a replacement will sit level, clear the suitcase shell, and roll smoothly.
- Diameter: larger wheels roll over bumps easier but may rub inside the shell.
- Width: wider wheels distribute weight better and resist sinking into carpet.
- Match clearance: measure space and compare specs so new wheels fit without binding.
What Axle Length and Thread Specs You Must Match
Diameter and width determine how a wheel sits, but the axle and its threads control whether that wheel actually secures and spins properly.
You must match axle length so the wheel clears casing and washers compress correctly. Match thread diameter and pitch to fit the nut or housing—common specs are metric M4–M6.
Check head style and shaft type (smooth, threaded, or shoulder) before buying replacements.
How Wheel Material Affects Durability and Ride
When you pick replacement wheels, the material determines how long they’ll last and how smoothly your bag rolls: hard plastics resist gouges but transmit bumps, polyurethane balances shock absorption with wear resistance, and rubber offers the quietest, most cushioned ride at the cost of faster wear on rough surfaces.
- Hard plastic — durable, noisy.
- Polyurethane — smooth, long‑lasting.
- Rubber — quiet, cushioned.
How to Match Wheel Hardness (Durometer) to Surfaces
A few simple numbers—the durometer ratings—tell you how hard a replacement wheel is and which surfaces it’ll handle best.
Choose 60–70A for smooth indoor floors; 75–85A for mixed airport terminals and sidewalks; 90A+ for rough pavement and curbs.
Softer wheels grip and roll quietly but wear faster; harder wheels resist cuts and glide over uneven terrain.
How to Match Wheel Color and Style to Your Case
Besides matching hardness to where you’ll roll, you’ll want wheels that look right on your Samsonite—color and style affect both aesthetics and perceived value.
Choose wheels that complement your shell and trim. Consider finishes and spoke designs.
Choose wheels that echo your shell and trim—mind the finish and spoke style for a polished look.
- Match color to shell or accents for cohesion.
- Pick matte for subtle, glossy for dressier.
- Use contrasting wheels sparingly for a modern pop.
Where to Find OEM Samsonite Replacement Wheels
Looking for OEM Samsonite replacement wheels?
Check Samsonite’s official website and authorized parts portal for model-specific wheels and part numbers.
Contact Samsonite customer service with your suitcase model and serial number.
Also visit Samsonite retail stores or certified service centers; they can order or install genuine parts.
Keep receipts and part numbers for warranty and future reference.
Using Third‑Party Wheels on Samsonite Luggage
You can often save money and extend the life of your Samsonite by fitting third‑party wheels, but you should match axle size, mounting style, and weight rating to avoid fitment or durability problems.
Save money and extend your Samsonite’s life with third‑party wheels—just match axle, mount style, and weight rating.
- Measure axle and housing precisely.
- Choose wheels rated for your luggage weight and terrain.
- Verify mounting compatibility and test roll and swivel before travel.
How to Adapt Universal Wheels to Samsonite Mounts
When adapting universal replacement wheels to a Samsonite mount, start by confirming the axle diameter, housing depth, and mounting hole pattern so the new wheel will sit squarely and operate smoothly; if dimensions differ, use bushings, washers, or an adapter plate to bridge the gap and maintain proper bearing alignment. Fit, secure, test rotation.
| Step | Tool | Note |
|---|---|---|
| Measure | Caliper | Axle/hole |
| Fit | Bushings | Prevent play |
| Test | Spin | Smooth roll |
How to Order the Right Parts Online
Start by measuring the wheel diameter, axle length, and mounting width so you know exactly what fits.
Match those measurements and any visible model numbers to the product listing before you buy.
Also check the seller’s return policy and warranty in case the part isn’t compatible.
Measure Wheel And Axle
Before ordering replacement parts, measure the wheel diameter, tread width, axle length, and axle diameter so you can match specs exactly.
You’ll need precise numbers to find compatible parts online. Record measurements and note material and mounting style.
- Wheel diameter and tread width
- Axle length and diameter
- Mounting type and any spacers or bushings
Match Model Numbers
How do you make sure the replacement wheels you order will actually fit your Samsonite? Start by locating the model number on the suitcase tag or inside the case.
Use that exact model when searching manufacturer sites or authorized parts sellers. Cross-reference part numbers and photos, confirm axle type and mounting style, and save seller contact info in case you need verification before buying.
Check Return Policies
Now that you’ve matched model numbers and verified part photos, check return policies so you don’t get stuck with unusable wheels.
You’ll want clear terms before ordering:
- Return window and condition required.
- Refund vs. store credit and restocking fees.
- Who pays return shipping and how defects are handled.
Confirm these so you can swap parts risk-free if they don’t fit.
How to Verify Part Compatibility Before Buying
Want to avoid buying the wrong wheel? Measure axle diameter, wheel housing size, and mounting hole spacing on your suitcase.
Note model and serial numbers, then compare with part listings or OEM diagrams.
Check whether wheels are universal or model-specific and read user photos/reviews for fit confirmation.
Verify if wheels are universal or model-specific, and consult user photos and reviews to confirm fit before buying
If unsure, contact Samsonite support or the seller with your measurements before purchasing.
How to Check Weight Rating and Load Capacity
Start by checking the wheel’s stamped or printed specifications—manufacturers often mark maximum load per wheel—and compare that number to your suitcase’s total weight when packed divided by the number of wheels to confirm each wheel can handle its share.
- Weigh your packed bag.
- Divide by wheel count.
- Confirm each wheel’s rating exceeds that result, including a safety margin.
How Much Does a DIY Wheel Replacement Cost?
Replacing the wheels yourself usually costs only the price of parts and a few basic tools, often $10–$50 depending on wheel quality and whether you need a screwdriver, hex key, or replacement pins.
You’ll save on labor compared with professional repair shops, which can charge $40–$100 or more.
We’ll compare typical parts/tool costs to shop quotes so you can decide if DIY is worth your time.
Parts And Tools Cost
A DIY wheel replacement usually costs between $10 and $60 in parts and tools, depending on your suitcase model and whether you buy OEM or generic wheels.
You’ll need basic items and choices; estimate carefully.
- Wheels: $8–$40 (generic vs OEM)
- Screws/axles: $2–$10
- Tools: $0–$10 (you may already own screwdrivers/pliers)
Labor Versus DIY
While parts often determine the upfront cost, your time and skill level decide whether DIY actually saves money, so factor in labor when calculating total expense. You’ll spend 30–90 minutes per wheel, tools may add $10–40, and mistakes cost more. Compare shop quotes versus your hours to decide.
| Item | Typical Cost |
|---|---|
| Tools | $10–40 |
| Parts | $15–60 |
| Time | 0.5–3 hrs |
| Repair shop | $30–100 |
How Much Does Professional Wheel Repair Cost?
How much will you pay to have a pro fix your Samsonite’s wheels?
Expect costs from simple repairs to full replacements depending on damage and parts.
- $25–$50 for cleaning, lubrication, minor adjustments.
- $50–$100 for wheel replacement per wheel (labor + basic parts).
- $100+ for specialty parts, expedited service, or warranty work.
When Replacing Wheels Is Cheaper Than Buying New
If the repair estimate on your Samsonite starts edging toward the cost of a new bag, you’ll want to compare replacements versus buying fresh—sometimes fixing the wheels makes more sense, sometimes it doesn’t. You’ll save when wheels plus labor cost significantly less than replacement, your case body is intact, and you prefer keeping the model.
| Condition | Repair cost | Decision |
|---|---|---|
| Low repair | <$75 | Replace |
| Moderate | $75–$150 | Compare |
| High | >$150 | Buy new |
| Major damage | Any | Buy new |
When to Retire Your Samsonite Instead of Repairing
When repairs start stacking up or the shell’s structural integrity is compromised, it’s time to contemplate retiring your Samsonite instead of sinking more money into fixes.
When repairs pile up or the shell’s integrity fails, consider retiring your Samsonite rather than pouring money into fixes.
You’ll know to replace the bag when:
- Damage is widespread or irreparable.
- Repair costs approach replacement price.
- Safety or security is affected, like broken locks or exposed frame.
Choose replacement for peace of mind and travel reliability.
How to Use Threadlocker and Torque Axles Safely
Because loose axles and vibrating wheels can strip threads or back out mid-trip, you’ll want to apply the right threadlocker and tighten to the correct torque for a secure, lasting repair.
Use blue (medium) threadlocker on metal fasteners; avoid red (permanent) unless rebuilding.
Clean threads, apply sparingly, hand-start bolts, then torque to manufacturer spec with a calibrated wrench.
Recheck after first trip.
Lubricate Wheels Without Attracting Dirt
When you lubricate Samsonite wheels, pick a non-greasy lubricant like silicone spray or dry PTFE to keep grime from sticking.
Use only a small amount so you don’t attract dirt or drip onto the suitcase.
Wipe any excess immediately with a clean cloth to leave a thin, protective film.
Choose Non-Greasy Lubricants
Pick a light, non-greasy lubricant so your Samsonite’s wheels spin smoothly without collecting dust and grime.
Choose options that resist dirt and won’t gum up bearings. Consider:
- Silicone spray — repels moisture, stays clean.
- PTFE (Teflon) spray — low residue, long-lasting.
- Dry graphite or PTFE powder — great for tight spaces and keeps wheels tidy.
Apply Minimal Lubricant
Now that you’ve chosen a non-greasy lubricant, apply only a tiny amount to keep the wheels rolling without attracting dirt.
Dab a drop on each bearing or axle, spin the wheel to distribute it, and stop when movement feels smooth.
Avoid spraying; aim for controlled placement.
Let it settle briefly before using the suitcase to prevent excess migration.
Wipe Excess Immediately
Grab a clean, lint-free cloth and immediately wipe any excess lubricant from around the wheel housing and axle; doing this keeps grime from sticking and prevents lubricant from migrating into seams or the brake.
Then:
- Wipe until dry spots appear.
- Check wheel rotation for residue.
- Reapply tiny drops only if needed.
How to Align Spinners to Roll Smoothly After Install
After you’ve attached all four spinners, check their alignment by rolling the suitcase slowly on a flat surface; any wobble or dragging means an adjustment’s needed.
Tighten or loosen each wheel’s mounting screw incrementally, guarantee axles sit square in housings, and rotate wheels by hand to confirm free movement.
Recheck roll direction, making small tweaks until spinners track straight and turn without binding.
How to Test Balance and Wobble After Replacement
After replacing the wheels, you’ll want to roll the bag on a flat surface to check for steady tracking and any obvious wobble.
Then tilt the suitcase slightly and spin each wheel to see if they wobble or stick under load.
If any wheel hesitates, wiggles, or drifts, tighten or readjust the assembly before travel.
Roll Test On Flat
When you’ve fitted the new wheels, place the suitcase on a smooth, level floor and give it a steady push to check how it rolls; you’re looking for an even, straight path with no veering or pronounced wobble.
- Roll forward and note any pull to one side.
- Roll backward to confirm consistency.
- Repeat with light load so you can detect subtle imbalance.
Tilt And Spin Test
Balance matters: tilt the suitcase onto its side and give the wheel cluster a gentle spin to check for wobble, uneven resistance, or grinding noises.
Watch alignment as wheels rotate; any lateral play indicates loose bearings or misaligned mounts.
Repeat for each wheel, noting smooth, consistent spin.
Tighten or realign as needed, then recheck until rotation feels uniform and quiet.
Troubleshooting Noisy or Stiff New Wheels
1 common cause of noisy or stiff new wheels is trapped debris, manufacturing residue, or tight bearings that haven’t seated yet, so you should inspect, clean, and gently run them to identify the source before doing anything more invasive.
- Check for debris and remove with compressed air.
- Wipe residue and test rotation.
- Apply a drop of light lubricant and spin until smooth.
How to Reinforce Weak Housing With Epoxy or Plates
First, inspect the wheel housing for cracks, stripped threads, or thin plastic so you know how much reinforcement it needs.
Then pick a method—high-strength epoxy for small fixes or a metal plate and screws for heavier reinforcement.
Finally, clean the area, apply the epoxy or fit and fasten the plate according to the product instructions so the wheel mounts solidly.
Assess Housing Damage
Inspect the wheel housing carefully to determine whether cracks, stripped screw holes, or flexing are causing the wheel to wobble or pull away.
Then check and note:
- Visible cracks or fractures around the mount.
- Enlarged or stripped screw holes.
- Flexible or warped plastic that lets the wheel shift.
You’ll use these findings to guide reinforcement choices later.
Choose Reinforcement Method
Before you reinforce the housing, decide whether epoxy bonding or an added plate will better suit the damage and your skill level—epoxy works for small cracks and hairline failures, while metal or nylon plates are best for stripped mounts and large fractures. You’ll weigh permanence, load, and appearance before choosing.
| Option | Best for |
|---|---|
| Epoxy | Small cracks |
| Plate | Stripped mounts |
Apply Epoxy Or Plate
When you’ve decided epoxy will do the job, clean and roughen the damaged area. Mix the adhesive exactly per the manufacturer’s instructions, and clamp the housing so the bond cures under proper pressure.
For plate reinforcement, align the plate, drill pilot holes through the housing into solid material, and use stainless fasteners with backing washers to distribute load.
- Prep: degrease, sand, test fit.
- Glue: mix, clamp, cure fully.
- Plate: pilot, fasten, seal edges.
How to Repair Cracked Polycarbonate Wheel Wells
Crack repairs on polycarbonate wheel wells are doable at home with basic tools and a little patience.
Clean the area, sand lightly to roughen, and apply a solvent weld or high-strength plastic adhesive.
Reinforce from the inside with a small fiberglass or polycarbonate patch.
Clamp until cured, then sand and touch up paint.
Test fit before putting luggage back into service.
How to Replace Handles and Wheels Together
Fixing a cracked wheel well often leads you to inspect the handle and wheels, since worn or damaged mounts usually affect both; replacing them together saves time and guarantees proper alignment.
Fixing a cracked wheel well usually means inspecting and replacing the handle and wheels together for proper alignment.
- Remove old handle and wheels, noting screw types and mount orientation.
- Test-fit new parts to confirm alignment and clearance.
- Secure mounts snugly, check telescoping handle action and wheel spin before travel.
How to Switch a Two‑Wheel Case to Four Spinners
Switching a two-wheel Samsonite to four spinners gives you smoother maneuvering and less strain on the case, but it does mean planning for different mounts, wheel cavities, and balance.
You’ll check frame strength, cavity size, and whether new mounting plates fit.
Reinforce weak areas, route wiring or liners away, and test stability before regular use to avoid stress fractures or misalignment.
How to Adapt Universal Parts: Pros and Cons
When you consider using universal parts, check fit and compatibility carefully so you don’t end up forcing a wheel that won’t mate with your Samsonite’s mounts.
Expect some installation challenges—you may need adapters, different fasteners, or minor shell modifications.
Balance those fixes against performance trade-offs like reduced maneuverability or durability before you commit.
Fit And Compatibility
Even if a universal replacement wheel seems like the easiest route, you’ll still need to check axle size, mounting plate pattern, and wheel diameter to guarantee a proper fit; mismatched parts can cause wobble, rubbing, or premature wear.
- Measure axle and hole spacing carefully.
- Match wheel diameter and width to original.
- Verify mounting hardware compatibility before buying.
Installation Challenges
Although universal replacement wheels can save time and money, you’ll face several practical installation challenges that need upfront planning.
You may need adapters, different screws, drill work, or custom brackets to match mounting points. You’ll also check clearance, axle diameter, and casing strength.
If you’re not skilled, expect extra time, specialty tools, and possible professional help to guarantee secure, aligned installation.
Performance Trade-Offs
If you choose universal wheels, expect clear performance trade-offs: they can restore mobility quickly and cheaper than OEM parts, but you may sacrifice smoothness, durability, or handling because dimensions, bearing quality, and wheel profile rarely match the original exactly.
- Faster, cheaper fix
- Possible rougher roll and noise
- Shorter lifespan or fit issues
How to Prepare Your Bag Before Taking It to a Shop
Before you head to the shop, empty the bag and remove any loose items from pockets and the main compartment so nothing falls out while they work.
Zip and fasten all compartments, detach straps or accessories, and snap a photo of the suitcase for reference.
Note serial numbers or damage, pack small hardware in a labeled bag, and lock or tag the case for identification.
How to Find Reputable Luggage Repair Shops Near You
Start by checking local repair shops and reading recent reviews to find ones that handle hard-shell luggage and wheel replacements.
Ask whether they’ve certified technicians and what certifications or experience they can show.
Get written estimates that include parts, labor, and expected turnaround time before you commit.
Local Repair Shop Search
When you need a reliable repair for your Samsonite wheels, focus on shops that show clear experience with luggage brands and parts; their confidence handling similar cases usually means faster, more durable fixes.
Check local options and reviews, then call to confirm services.
- Ask about parts availability.
- Request turnaround time.
- Compare prices and warranties.
Certified Technician Verification
Because a certified technician can make the difference between a temporary fix and a long-lasting repair, verify credentials and experience before handing over your Samsonite.
Check for manufacturer certifications, trade school diplomas, or industry association memberships.
Read recent reviews, ask for before-and-after photos of similar repairs, and confirm they use genuine parts.
Trust technicians who provide documented warranty terms for their work.
Estimates And Turnaround Time
Get at least three written estimates so you can compare costs, parts used, and turnaround times before committing your Samsonite to a shop.
You should verify warranty handling, ask about genuine Samsonite parts, and confirm pickup/drop-off options.
Compare:
- Price and parts warranty
- Expected turnaround and delays
- Technician credentials and reviews
Choose the shop that balances cost, speed, and trust.
How to Evaluate a Repair Shop Quote and Turnaround
How quickly can you get your Samsonite back on the road—and at what cost? You’ll compare itemized parts, labor hours, warranty length, and turnaround. Ask for written estimates, deadlines, and penalties for delays. Check reviews for reliability. Use this quick comparison table to weigh options before committing.
| Shop | Price | Time |
|---|---|---|
| A | $45 | 3 days |
| B | $60 | 1 week |
How Samsonite Customer Service and Parts Centers Work
When you contact Samsonite customer service or visit a parts center, expect a mix of phone, email, and online support that guides you from diagnosis to parts ordering and repair tracking.
Agents will confirm your model, serial number, and warranty status, then tell you whether they’ll ship parts, direct you to an authorized repair center, or schedule a mail-in service.
- You’ll get guidance.
- They’ll verify details.
- They’ll outline costs.
Quick Checklist for a Successful DIY Wheel Swap
Before you start, gather the right tools, replacement wheels, and any model-specific instructions so you won’t stop mid-job. You’ll need a screwdriver or hex key, pliers, spare screws or rivets, and a clean workspace with good light.
Check wheel compatibility, inspect mounts for damage, remove old hardware carefully, test-fit new wheels, torque fasteners to spec, and verify smooth rotation before reassembling and packing.
Top Mistakes to Avoid When Replacing Samsonite Wheels
Now that you’ve got tools, parts, and a plan, steer clear of common pitfalls that can undo your work or damage the suitcase.
- Don’t force parts—measure and align before tightening to avoid stripped screws or warped mounts.
- Don’t mix incompatible wheels or fasteners; fit matters for stability.
- Don’t skip testing; roll and load the bag to confirm smooth operation and secure attachment.
Common Replacement Wheel Parts and Terminology
If you’re swapping wheels on your Samsonite, getting familiar with the common parts and terms will make the job faster and reduce mistakes.
You’ll encounter single/double spinner wheels, wheel housings, axles, bearings, bushings, and mounting plates.
Note rivets versus screws, inline versus swivel mounts, and replacement kit compatibility.
Check rivets versus screws, choose inline or swivel mounts, and confirm replacement kit compatibility before ordering.
Measure axle diameter and wheel width before ordering to guarantee a proper fit.
Frequently Asked Questions
Can Wheel Replacement Void My Samsonite Warranty Entirely?
Yes — replacing wheels yourself can void your Samsonite warranty if it violates their terms or causes damage; you’ll want to check warranty details or contact Samsonite first, and consider authorized repair to keep coverage intact.
Are There Safety Concerns Driving With Luggage in Overhead Bins?
Yes — you should be cautious: unsecured luggage can shift during turbulence or sudden stops, hitting passengers or blocking exits. You’ll want to stow items tightly, use overhead bin straps where available, and avoid overpacking.
Will Airline Handling Policies Affect My Repaired Wheels?
Yes — airline handling can affect your repaired wheels, since baggage handlers may still toss or stack bags roughly; make sure repairs are sturdy, use durable parts, reinforce the mount, and consider labeling or gate-checking to reduce damage.
Can I Insure Repaired Luggage Against Future Wheel Failures?
Yes — you can often insure repaired luggage against future wheel failures through homeowner’s or travel insurance, or a separate baggage protection plan; check policy terms, declare repairs, and keep receipts so your claim won’t get denied later.
How Long Should Replaced Wheels Typically Last Under Heavy Travel?
Under heavy travel, replaced wheels typically last one to three years depending on quality and usage; you’ll get longer life with high-quality bearings and frequent maintenance, but expect noticeable wear if you regularly haul heavy loads and rough surfaces.
Conclusion
Yes — you can often replace Samsonite wheels, and doing so can save money and extend your bag’s life. Start by checking whether your model has removable wheels (some use axles, rivets, or clips). If the damage is minor and parts are available, repair’s worth it; severe damage or no parts mean buying new. Samsonite’s warranty sometimes covers defects but not normal wear. Use OEM or compatible parts, follow a DIY checklist, avoid forcing components, and contact Samsonite support or authorized repair centers when in doubt.