How to Reset London Fog Luggage Lock
First confirm your London Fog lock is a mechanical 3‑digit TSA model (look for dials and a Travel Sentry logo). Open the case or shackle using the current code (default 0‑0‑0 if unused). Locate and press or slide the small reset button or lever, hold it, spin each dial to your new three‑digit code, then release. Test the new code several times before closing. Keep the code recorded and continue for tips on troubleshooting, maintenance, and contacting support.
Reset Your London Fog Lock : Fast
If you need to reset your London Fog luggage lock quickly, start by locating the small reset button or slot—it’s usually on the side or bottom of the lock.
With the current combination set, press and hold the reset button using a pointed tool or insert the tool into the slot while keeping pressure.
With your current code in place, press and hold the reset button (or insert a tool into the slot) while changing dials.
Turn the dials to your new combination, release the button, then scramble the numbers and test the new code several times to confirm it locks and opens smoothly.
If it doesn’t respond, retry with firmer pressure or double-check the existing code before repeating the steps.
Identify Which London Fog Locks Use a 3‑Digit Code
Check the lock on your London Fog luggage to see if it has rotating dials—those models typically use a 3-digit code.
Built-in TSA locks often also use three numbers, though the dial style can vary.
If you spot either feature, you’ll know which resetting steps to follow.
Lock Models With Dials
When you’re looking at London Fog luggage, many of their suitcase locks use a three‑digit dial code—these are the recessed combination locks mounted directly into the case or the small TSA‑approved padlock styles that come attached to zippers. You’ll spot a small recessed panel with three rotating wheels or a compact padlock with numbered dials. Models with external dials are rare; most built‑in units follow the three‑digit pattern. Check the zipper pulls and side panels for dials, note default 0‑0‑0, then follow reset steps. Use this quick reference:
| Location | Type | Notes |
|---|---|---|
| Side panel | Recessed | 3 wheels |
| Zipper | Padlock | Attached |
| Handle | Rare | Internal unit |
Built‑In TSA Locks
Although London Fog makes several lock styles, most of their built‑in TSA locks you’ll find on hard‑side and many soft‑side suitcases use a three‑digit combination, with the wheels recessed into the case or integrated into a small padlock attached to the zipper pulls.
You’ll usually see a numbered dial trio set to 0‑0‑0 at purchase. Check the case edge, top handle area, or zipper head for a tiny TSA logo indicating an approved mechanism.
If you need to reset, consult the manual or follow standard steps: open lock, press or slide the reset button, set your new three digits, then release to lock in.
Find the Lock Model and Instructions on Your Suitcase
Before you try any reset method, locate the lock model and read the instructions printed on your suitcase so you know the correct procedure and avoid damage. Check around the zipper junction, interior lining, or the luggage frame for a small label, stamped code, or diagram.
Note model numbers, manufacture dates, and any tiny printed steps; these determine the reset sequence. If you find a symbol or short code instead of full directions, jot it down and photograph the area.
Keep the manual pocket or tag with your bag — manufacturers sometimes include a removable instruction card you’ll need for accurate resetting.
Is the Lock TSA‑Approved?
Check whether your London Fog lock carries the Travel Sentry or Accepted by TSA logo to confirm TSA approval. If it does, TSA agents can open and re-lock it with a master key without damaging your luggage.
If it doesn’t show those markings, you’ll need to release it yourself or risk having it cut if inspection is required.
TSA Approval Status
Want to know if your London Fog luggage lock will pass through airport security? Many London Fog locks are TSA‑approved, featuring a small red diamond logo that lets Transportation Security Administration agents open them with a master key without damaging the lock.
If your lock is TSA‑approved, you can expect smoother inspections and fewer forced openings. Keep in mind models vary by year and retailer, so don’t assume every London Fog lock has TSA approval.
If you travel often, verify approval before flying and register any combination or key details separately in case security needs to access your bag.
How To Identify
Although models vary, you can usually tell if a London Fog lock is TSA‑approved by looking for the small red diamond Travel Sentry logo on the lock body or near the zipper pull. That symbol means TSA agents can open it with a master key without damaging it.
Check for engraved or printed wording like “TSA” or “Travel Sentry” as confirmation.
If no logo appears, inspect the keyhole: TSA locks often have a secondary key slot for agents.
When in doubt, consult the luggage tag, original packaging, or the manufacturer’s website with your model number to verify approval before travel.
Quick Check: Is It Electronic or Mechanical?
Before you try to reset the lock, determine whether your London Fog luggage uses an electronic keypad or a mechanical dial—each type needs a different method. Look at the lock face: a backlit panel, small LCD, or buttons indicates electronic.
If you see numbered rotating discs or three tumblers, it’s mechanical. Check for a battery compartment or charging port—presence confirms electronic. Mechanical locks won’t have power features and operate by turning dials.
Also inspect the luggage tag or manual for symbols like “TSA” with a battery icon. Identifying the type prevents using the wrong reset steps and avoids damaging the mechanism.
Set the Factory Default Code (How to Find It)
How do you find the factory default code for your London Fog lock? Check the packaging, instruction booklet, or hang tag—manufacturers usually print the default code there.
If you no longer have those, inspect the lock body: many mechanical models show a stamped or molded three-digit factory number near the dials or on the backside.
For electronic models, look for a sticker on the battery compartment or inside the case once opened.
If you can’t find any marking, search the model number online with “factory code” or contact London Fog customer service with the serial/model for confirmation.
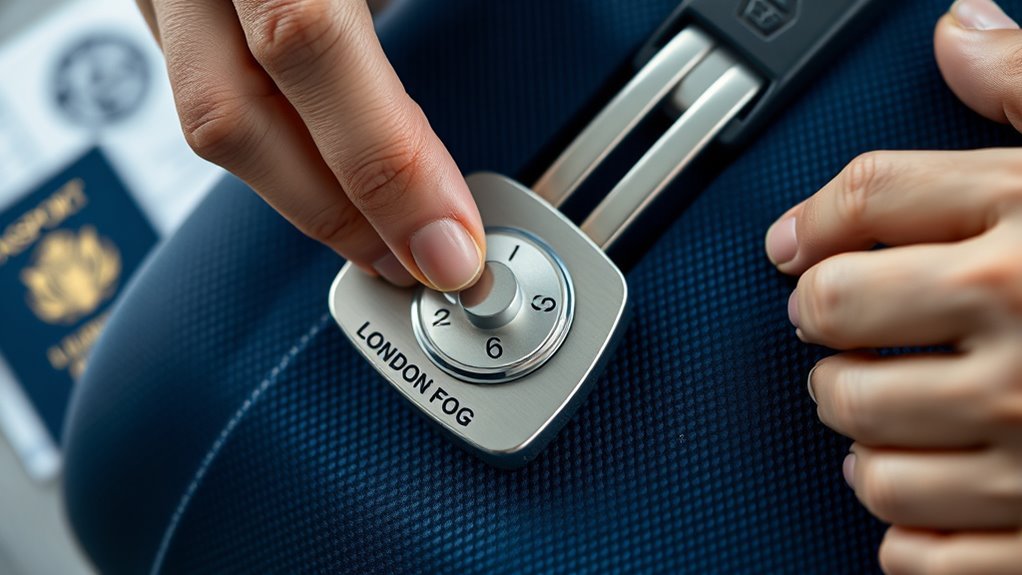
Locate and Use the Reset Button or Lever
Look for a small recessed button or a sliding lever near the shackle or combination dials—that’s your reset mechanism.
Once you’ve found it, set the lock to the factory code and open the shackle or follow the lock’s prep instructions so it’s ready to accept a new code.
Press and hold (or move) the reset button/lever, set your new combination, then release to lock it in.
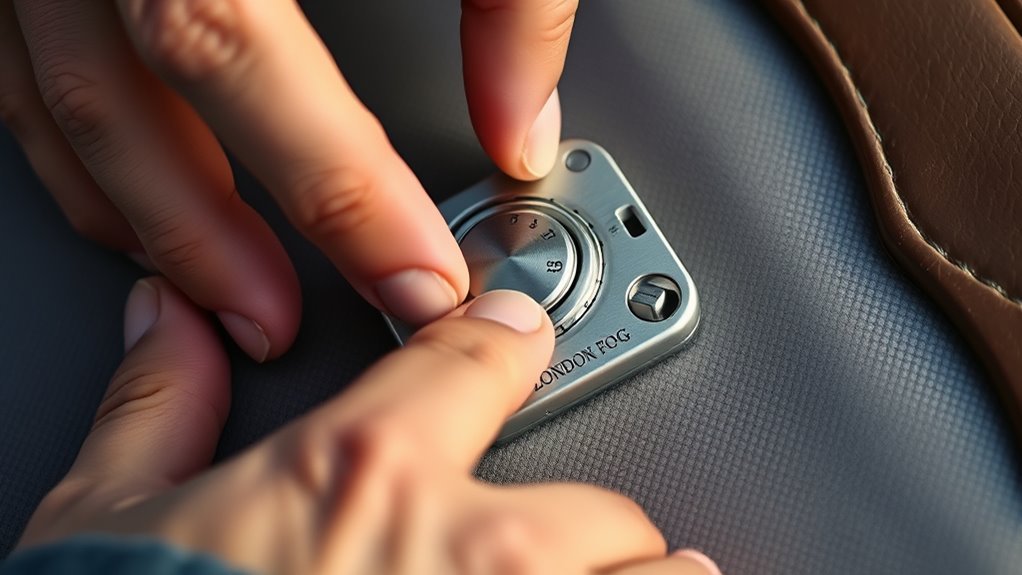
Find The Reset Mechanism
Curious where the reset hides on your London Fog lock? Check the faceplate, shackle base, or underside for a small pinhole, recessed button, or sliding lever. Use a flashlight and magnifier if needed.
Buttons are often labeled with tiny “R” or arrow marks; levers may require a fingernail or small tool to move into the reset position. Pinhole resets need a paperclip or SIM ejector; you’ll feel a click when engaged.
Note any protective covers—flip or slide them aside. Observe orientation so you can return the mechanism to its locked position after resetting.
Prepare The Lock For Reset
Before you start, make sure the lock is set to the current combination and the zipper pulls (or shackle) are fully aligned so the reset mechanism can engage without obstruction.
Locate the tiny reset button or lever—often recessed on the lock body or inside the shackle hinge. Use a pointed tool or your fingernail to access it; don’t force anything.
Hold the lock so you can see the mechanism clearly and keep the case steady.
Note the button’s orientation and how far it needs to move.
Prepare adequate light and space, and keep the zipper pulls positioned where they won’t slip during the reset.
Engage And Release Lever
Once the combination is showing the current code, press the recessed reset button or slide the tiny lever into its engaged position using a pointed tool or your fingernail. You’ll feel a slight click or movement when it’s set.
Hold the lever or button in that engaged position while you rotate each dial to your new chosen numbers, aligning them precisely with the indicator mark. Keep steady pressure; releasing too soon cancels the change.
After setting all digits, release the lever or let the reset button pop back; the mechanism will lock the new code.
Test the new combination before closing the luggage.
Align Dials Correctly Before Resetting
When you line the three dials up to the current combination, make certain each number sits exactly in the center of its window; even a slight offset can prevent the lock from releasing.
Check visually from above and straight-on so numbers aren’t skewed by perspective.
Rotate each wheel fully past the desired digit, then roll backward to settle it precisely in the groove.
Feel for a subtle click or resistance that indicates proper alignment.
If one dial slips, re-set all three rather than hunting for a single misaligned wheel.
Proper alignment ensures the mechanism will respond when you proceed to change settings.
Reset From the Open Position: Step‑by‑Step
Now that your dials are precisely aligned and the lock opens smoothly, you can reset the combination from the open position in a few quick steps. Keep the shackle or latch open.
Locate the small reset button or lever—usually inside the lock cavity or beside the dials. Use a pointed tool or your fingernail to press and hold the button (or move the lever into the reset position).
While holding it, rotate the dials to your new three‑digit code, aligning each number with the marker.
Release the button or return the lever to its normal position.
Test the new code several times before closing the lock.
Reset When You Forgot the Code: Step‑by‑Step
If you’ve forgotten your London Fog lock code, first locate the reset mechanism—usually a small button or pinhole near the dials.
You’ll use a paperclip or similar tool to trigger that reset while turning the wheels to a new combination.
Follow the manufacturer’s reset steps carefully so the lock registers and saves your new code.
Locate Reset Mechanism
Before you try combinations or call for help, check where the reset mechanism actually is on your London Fog lock so you don’t accidentally jam or damage it.
Inspect the exterior: many models hide a small recessed button near the dials or inside the shackle hole. Use good light and a magnifier if needed.
If the lock has a removable cover or a tiny screw, don’t force it—consult the luggage manual or manufacturer diagrams first.
Note the button’s orientation and whether you need a tool (paperclip, pin).
Photograph the area for reference before attempting any reset steps.
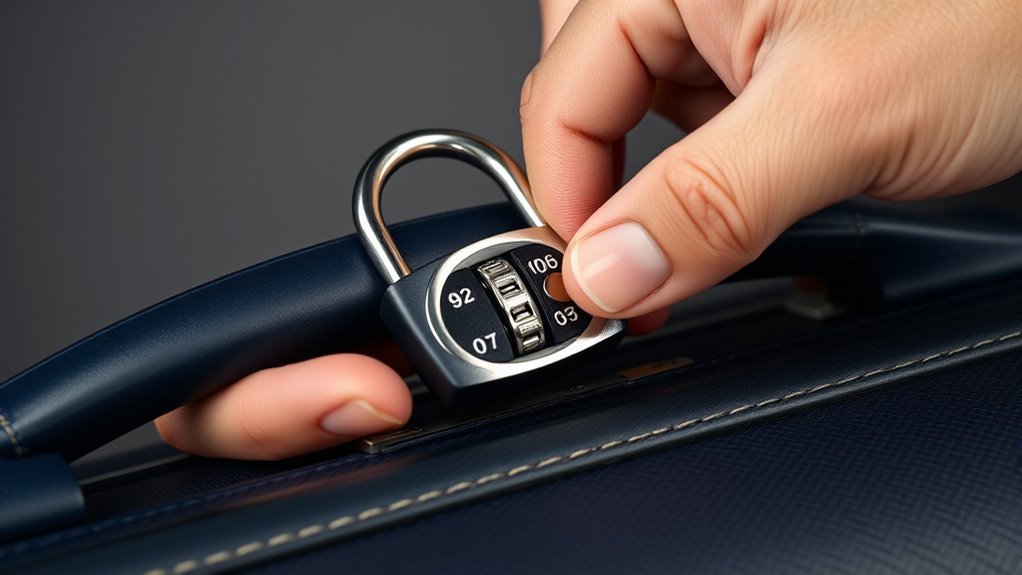
Reset Combination Steps
When you’ve lost your London Fog lock code, follow a clear, step‑by‑step process to avoid damage and regain access.
First, set the dials to the factory combination (usually 0-0-0) or your last remembered code.
Apply gentle pressure to the release button or shackle while you slowly rotate each dial, listening and feeling for a subtle click when the correct number passes.
Once the lock opens, keep the shackle depressed or button held.
Set your new three-digit combination by rotating dials to your chosen numbers, then release.
Test the new code several times before locking.
Store it securely.
Safely Force‑Open a Stuck Lock Without Damage
Although you want the lock open quickly, take steps that protect your luggage and the lock’s mechanism; rushing or using excessive force can bend or break internal components.
First, apply steady tension on the shackle or zipper pull while gently turning the combination dials—sometimes internal tumblers will settle. Try small incremental jiggles rather than hard pulls.
Use a pencil eraser or soft plastic tool to nudge stuck parts; avoid metal picks that can scratch or jam the mechanism.
If lubrication helps, use a tiny drop of graphite or silicone spray, not oil.
Test slowly; if it resists, stop to avoid damage.
When to Stop and Call a Pro
If your attempts to free the lock have used steady tension, gentle jiggles, and a little lubrication but the combination still won’t move or the shackle won’t release, stop and call a pro—continuing can damage the lock or the zipper.
You should seek professional help when you’ve tried reasonable noninvasive steps, lack the original key or code, or see visible bending, stripped dials, or internal grinding.
Also call a pro before using power tools or cutting, especially with valuable contents. A locksmith or luggage repair service can open, assess internal damage, advise replacement options, and preserve warranty or travel insurance claims.
Resetting TSA Key Locks vs. Combination Locks
When you’re working on a London Fog lock, TSA key locks and combination locks behave differently and need different steps.
TSA key locks open with a master key and usually only need inspection or a locksmith if the mechanism’s jammed.
Combination locks require you to follow reset sequences or use the factory code, so you’ll handle those yourself more often.
TSA Key Lock Basics
Curious how TSA key locks differ from the combination locks you’re used to? You’ll find TSA key locks use a universal keyhole for screened agents; you don’t set or reconfigure them yourself. You’ll still lock and open normally with your own latch or code on dual systems, but TSA access is separate. Keep your luggage accessible for inspections by ensuring external lock mechanisms are operable and unobstructed. Refer to the quick table below for clarity.
| Feature | TSA Key Lock | Your Lock |
|---|---|---|
| Access | Universal key | Personal code/key |
| Control | TSA agents | You |
| Resettable | No | Often yes |
| Inspection | Allowed | Controlled by you |
Combination Lock Differences
TSA key locks and combination locks look similar from the outside, but you’ll handle resets very differently. With TSA key locks, a baggage inspector uses a master key; you can’t change that mechanism.
Combination locks let you set and reset your own numeric code, so you’ll need to follow the lock’s specific reset steps carefully. Always confirm the current combination before attempting a reset.
Use the manufacturer’s instructions: usually you align numbers, engage a reset button or lever, set a new code, then release. Test the new code several times before traveling to avoid being locked out.
How TSA Approval Changes Reset Steps
Because airport security needs a way to inspect checked bags, TSA-approved London Fog locks include a keyed or combination override that changes how you reset them.
You’ll first identify the TSA logo and locate the auxiliary keyhole or reset slot. If there’s a key override, don’t force the dial; insert the TSA key if available or follow the manufacturer guide to align internal tumblers before resetting.
For combination overrides, set the indicated code or press the reset button while the lock is open.
Always verify the lock cycles and that the override returns to its secure position before travel.
Change Your London Fog Code to Something Memorable
Choose a simple, memorable combination—like a meaningful date or pattern you’ll actually remember.
Follow the lock’s reset steps to set that code, then test it several times before closing the lock.
Keep the new combination somewhere secure until you commit it to memory.
Pick A Memorable Combination
While you’re resetting your London Fog lock, pick a code you’ll actually remember—one that’s personal but not obvious to others. Use a pattern tied to non-public facts: parts of an address, a favorite book’s chapter and page, or a meaningful year altered slightly.
Avoid birthdays, phone numbers, or anything shared on social media. Choose numbers you can visualize or repeat mentally as a short phrase. Keep it simple so you won’t need to write it down.
If you travel with others, don’t share the code widely. Periodically review and update the combination when your routines change.
Set And Test Code
Once you’ve settled on a memorable code, set it on the lock and test it several times to confirm it engages smoothly and reliably. Rotate each dial to your chosen numbers, press the release mechanism, and close the shackle or latch.
Open and close the lock repeatedly—at least five cycles—to ensure the combination registers every time. If it sticks or skips, reset to the original code and repeat the process more slowly, cleansing the dials of debris.
Record your new code in a secure place, not on the luggage. Now you’ll travel confidently knowing your London Fog lock works as designed.
Test a New Code Before You Close the Bag
How will you know the new combination works? Before tucking belongings in, try the code several times: open and close the lock, scramble the dials, then re-enter the numbers.
Test with gentle pressure on the shackle or zipper pulls so it’s realistic. If it doesn’t release, reset and repeat until it’s dependable.
Verify from different angles and after a brief pause to ensure memory holds. Only when the lock opens consistently should you pack.
Don’t close the bag assuming success; a final check saves hassle at security or mid-trip. Confirming now prevents being stranded later.
Record and Store Your Luggage Code Securely
Because you’ll want quick access without compromising security, record your luggage code in two reliable ways: one physical and one digital. Write the code on a small card kept inside a separate compartment or with travel documents, and store an encrypted note on your phone or password manager.
Don’t label it “luggage code” explicitly; use a hint only you’ll understand. Update both records if you change the code.
If someone asks, avoid sharing the exact numbers. Review your storage method before each trip and remove the physical note when it’s not needed to minimize risk.
- Small card in travel wallet
- Encrypted note/password manager
- Personal hint only visible to you
Change Codes on Several Bags at Once
If you’re updating multiple London Fog locks before a trip, tackle them in a consistent, step-by-step routine so you don’t mix up codes or miss a bag.
Lay bags out and work one at a time, noting the bag position (e.g., carry-on, checked 1).
Set each lock to a temporary master code you’ll change to the final code immediately.
After changing a lock, mark it as done on a checklist and test the new combination twice.
Keep the same final code for related bags if security needs match; otherwise use distinct codes and record each clearly before travel.
Avoid Accidental Code Changes During Travel
When you’re on the move, small bumps and jostles can accidentally reset a London Fog lock, so take simple precautions: secure zippers away from the dials, slide the shackle or latch fully closed before turning, and tighten any zipper pulls with a rubber band or cable tie.
You’ll want predictable handling: set codes before travel, test each lock briefly, and keep a record of combinations separate from the bag.
If you carry multiple locked items, group them so they don’t rub. Use these quick habits to prevent surprises and avoid fumbling at checkpoints.
- Position zippers away from dials
- Close latch fully before turning
- Record codes externally
Clean and Maintain the Lock for Smooth Use
Keeping the lock clean and lightly lubricated will keep the dials turning smoothly and reduce the risk of jams, so make it part of your regular luggage care. You’ll wipe the exterior with a soft cloth, clear debris from crevices with a soft brush, and apply a tiny amount of graphite or silicone lubricant into the keyway and around the dials. Cycle the combination several times to distribute lubricant. Check for corrosion and dry thoroughly after exposure to moisture. Store luggage in a dry place. Follow the chart below to choose tools and frequency.
| Task | Tool | Frequency |
|---|---|---|
| Wipe | Cloth | Monthly |
| Brush | Soft brush | After trips |
| Lubricate | Graphite/silicone | Every 6 months |
Common Faults: Jammed Dials, Broken Latch, Misaligned Tumblers
Regular cleaning and lubrication help prevent many problems, but locks still wear out or get damaged from knocks, moisture, or forceful attempts to open them.
You’ll encounter three common faults: jammed dials from dirt or bent teeth, a broken latch that won’t retract, and misaligned tumblers that refuse to engage.
Inspect visually, gently test components, and note any corrosion or deformation.
For safety, avoid excessive force that causes further damage.
If basic checks don’t reveal a fix, consider professional repair or replacement to protect your luggage and belongings.
- Jammed dials
- Broken latch
- Misaligned tumblers
What to Try If the Dials Are Stuck or Jammed
If a dial feels stuck or won’t spin, stay calm and work methodically to free it without forcing anything. Gently wiggle each dial while applying slight pressure toward the locked position; sometimes tension releases internal pins.
Use a thin toothpick or plastic pry tool to clear debris from dial gaps.
Apply a drop of silicone-based lubricant into the seam—avoid oil that attracts dirt—and cycle the dials back and forth to distribute it.
Tap the lock lightly against your palm to dislodge stubborn grit.
If one dial remains immobile, align adjacent dials to different numbers and try again; repeated gentle manipulation often restores movement.
What to Try If the Reset Button Won’t Depress
Sometimes the reset button can feel as stubborn as a stuck dial, but you can usually free it with careful steps. If it won’t depress, first verify the lock is aligned to the correct combination and pressure is even. Use a small tool—like a plastic spudger—to press gently, avoiding metal that could damage the mechanism. Warm the area slightly with your hand to loosen grime, but don’t use heat sources.
- Apply steady, centered pressure with a nonmetal tool.
- Clean around the button with compressed air or a soft brush.
- If still stuck, try depressing while cycling the dials slowly.
How to Interpret Partial Alignment or Strange Numbers
If the dials don’t seem to line up perfectly, check for partial alignment where a notch sits between numbers. You might be seeing offset digits that look “wrong” but are actually one click away from the correct mark.
If so, try sequential resetting by rotating each dial through its range and stopping precisely on the true notch before attempting to open.
Check For Partial Alignment
When a digit wheel doesn’t sit squarely in its notch, you’ll see numbers that look off-center or blend between two values; treat those as clues, not errors. You should rotate each wheel slowly to find the clearest, most centered numeral.
Lightly press the shank or release button as you test to feel for slight catches that reveal the true setting. Note subtle shadows or seams where digits align; they’re telling you which number the mechanism prefers.
If a wheel resists, back it one click and approach forward again until alignment locks.
- Rotate wheels slowly, watching center positioning
- Apply light pressure while testing
- Use seams/shadows as guides
Recognize Offset Digits
Because digits can sit slightly off their notches, you’ll need to learn how to read those half-steps: look for the number that’s most centered in the window, feel for a tiny catch under light pressure, and note any seam or shadow that indicates the wheel’s preferred position.
When a wheel shows a weird split between two numbers, treat the slightly recessed digit as the correct one.
Rotate wheels slowly while applying gentle tension on the shackle so you sense clicks. Mark each wheel’s favored alignment with a pencil dot.
Trust subtle visual and tactile cues rather than exact printed edges.
Try Sequential Resetting
Now that you can spot offset digits and mark each wheel’s favored alignment, try sequential resetting to interpret partial alignments or odd number splits. You’ll move one wheel at a time from a known mark, pausing where the shackle gives slight resistance, then record that position.
Repeat for adjacent wheels, noting tiny clicks or catches. Overlap these notes to deduce the true combination when digits sit between numbers. If a wheel seems ambiguous, backtrack one notch and test again.
Patience and methodical steps reveal the correct sequence without forcing the lock.
- Move wheels individually and note resistance
- Record borderline positions
- Cross-reference adjacent wheel notes
Use Lubrication Safely on a Luggage Lock
If your London Fog lock sticks or feels stiff, apply lubrication carefully to restore smooth operation without damaging the mechanism. You’ll want a precision lubricant like silicone spray or graphite powder; avoid oils that attract dirt. Work in a well-ventilated area, shield fabric, and test a small spray away from stitching. Insert lubricant into the shackle and keyway or combination tumblers sparingly, cycle the mechanism several times, and wipe excess immediately. Repeat only when needed to keep it smooth. Emotional reminder:
| Relief | Confidence |
|---|---|
| Quiet click | Secure travel |
| Smooth turn | Peace of mind |
Battery Issues in Electronic London Fog Locks
Having trouble with an unresponsive electronic London Fog lock? You’ll want to confirm power-related symptoms before trying resets. Check that the display, LEDs, or beeps behave differently when you press buttons.
Note intermittent operation, delayed responses, or complete silence—these point to battery-related faults rather than mechanical jams.
- Observe any dim lights, slow response, or no sound as signs of weak power.
- Keep corrosion, loose contacts, or moisture in mind; they can mimic dead batteries.
- Try soft resets and confirm error codes or blink patterns to distinguish firmware issues from power problems.
If power signs persist, consult replacement guidance.
How to Replace the Battery in an Electronic Lock
First locate the battery compartment—it’s usually on the back or underside of the lock and may require a small screwdriver to open.
Remove the old battery carefully, noting its orientation so you don’t mix up the polarity.
Install a fresh battery of the correct type, secure the cover, and test the lock before closing your bag.
Locate The Battery Compartment
Before you replace the battery, locate the compartment so you don’t fumble with parts or scratch the lock housing. Check the back of the lock or along the side for a small panel, screw, or snap cover. Use good light and a magnifier if needed. Keep a soft cloth under the lock to protect the finish. If you have the manufacturer’s guide or model number, reference it for compartment placement.
- Look for a recessed tab or tiny Phillips screw near the keypad.
- Inspect seams where a cover could snap off.
- Note any rubber plugs masking the battery access.
Remove Old Battery
Ready to swap the battery? First, power down the lock by ensuring the zipper pull is disengaged and the lock is open.
Use a small screwdriver to loosen the compartment screws; keep them and any cover safe.
Gently pry the cover away, avoiding force that could damage plastic clips.
Note the battery orientation before removal—take a photo if needed.
Use a non-metal tool or fingertip to lift the old cell from its contacts, pushing from the negative side if space is tight.
Inspect contacts for corrosion; clean lightly with a cotton swab and isopropyl alcohol if needed.
Install New Battery
With the old cell out and contacts checked, install the new battery by matching its orientation to the photo or note you made and sliding it into the holder so the positive and negative ends sit firmly against the contacts.
Press gently until it clicks or rests flat, then confirm polarity and guarantee no debris blocks the connection.
Reassemble any covers, screws, or snap tabs in reverse order.
Test the lock by entering the code or triggering the mechanism; if it won’t power, reopen and reseat the cell.
- Verify positive (+) faces the correct contact
- Seat battery fully, no wobble
- Recheck connections before closing
How to Tell Electronic vs. Mechanical on Your Model
When you inspect your London Fog lock, look for a battery compartment, LED indicators, or a digital keypad—those tell you it’s electronic. If you see none, it’s likely mechanical.
When inspecting your London Fog lock, check for a battery compartment, LEDs, or keypad—absence usually means mechanical.
For electronic locks, you’ll also spot buttons, a small charging port, or a model number referencing “digital” or “electronic.” Mechanical locks show dials, a rotary combination, or a simple latch with no power source.
Test gently: press a button—if lights or tones respond, it’s electronic. If only tumblers rotate and nothing powers up, it’s mechanical.
Identifying type guides reset steps and tells you whether batteries or manual tools are needed.
Recover a Lost or Forgotten Factory/Default Code
If you’ve lost the factory code, start by checking common default code locations like the instruction booklet, hang tag, or inside the zipper compartment.
If you can’t find it, you’ll need to follow the specific reset procedure steps for your London Fog model—usually aligning dials, pressing the reset button, and setting a new combination.
Keep any replacement code notes somewhere safe so you won’t have to repeat the process.
Default Code Locations
Although most London Fog luggage locks ship with a simple factory code, you may need to check a few common spots to recover it. Look where manufacturers or retailers typically note default combinations before trying resets.
- Inside the suitcase: sewn tags, care labels, or hidden pockets may list the code.
- Retail packaging: hang tags, instruction sheets, or sticker on the box often show the factory number.
- Documentation: user manual, warranty card, or purchase receipt can record the original combination.
Check these locations carefully; if you still can’t find the code, consult the manufacturer or seller for guidance before attempting a reset.
Reset Procedure Steps
Because you couldn’t find the factory code in the usual spots, you’ll need to run through a systematic reset process that regains access without damaging the lock. First, set dials to 0-0-0, press the reset button with a pin, then rotate the shackle or latch to release position. Choose a new memorable code, hold reset until numbers set, then test multiple times before closing. If it doesn’t reset, repeat steps gently. Stay calm and patient.
| Fear | Hope | Relief |
|---|---|---|
| Frustration | Action | Success |
| Doubt | Method | Freedom |
Avoid Common Mistakes When Resetting the Code
When resetting your London Fog luggage lock, take a moment to double-check each step so you don’t accidentally lock yourself out. You’ll avoid common mistakes by confirming the current code, aligning digits precisely, and keeping the reset mechanism fully depressed while setting the new combination.
Don’t rush; slips happen when you’re distracted or handling luggage in tight spaces.
- Verify the original combination before starting
- Hold the reset button or lever firmly until the new code is set
- Test the new code several times before closing the suitcase
Follow those actions, and you’ll prevent lockouts and frustration.
How to Replace a Broken London Fog Lock Yourself
If your London Fog lock’s broken beyond resetting, you’ll want to remove the old lock first by opening any accessible screws or cutting the mounting pins.
Once the damaged unit is out, fit a compatible replacement lock into the same housing, making sure the shank and mounting points align.
Tighten the screws or secure the mounting pins, test the new lock, and you’re ready to travel.
Remove Old Lock
Before you install a new lock, you’ll need to remove the damaged London Fog lock carefully to guarantee harming the zipper or surrounding frame. Inspect the lock to determine attachment: screws, rivets, or molded housing. Gather small screwdrivers, pliers, and a magnifier. Work on a flat surface with good light.
- Unscrew or cut fasteners gently, supporting the zipper to prevent stress.
- Pry molded housings slowly, easing clips free without cracking plastic.
- Keep removed parts and any tiny hardware in a labeled container for reference or disposal.
Clean the area before fitting a replacement to guarantee proper alignment.
Install Replacement Lock
Now that the old lock is out and the area is clean, you can fit the new London Fog lock with confidence.
Position the replacement so its mounting posts align with the case holes. Insert screws through the interior plate, keeping the lock’s shackle or zipper pulls correctly oriented. Hand-tighten each screw, then use a screwdriver to secure them firmly—don’t overtighten and strip the threads.
Test the mechanism and combination before sealing the interior panel.
If your model uses rivets, follow the manufacturer’s rivet kit instructions or seek a professional.
Store the new combination in a safe place for future reference.
Choosing a Compatible Replacement Lock
When selecting a replacement lock for your London Fog luggage, match the lock type and mounting style to the suitcase’s existing hardware so the new unit fits securely and functions correctly. You’ll want a lock rated for travel, TSA-approved if you fly, and sized to the original mounting holes.
Check measurements, mounting bracket shape, and whether the lock uses a shackle, plate, or integrated zipper mount. Confirm materials resist corrosion and that the combination mechanism operates smoothly.
Measure the mount and hole pattern, pick the correct shackle, plate, or zipper-style, and ensure corrosion-resistant, smooth operation.
Keep the original security level in mind and choose a reputable brand to avoid premature failure.
- Match type and mount
- Verify dimensions and holes
- Prefer TSA-approved, durable units
Install a New Combination Lock on Zipper Pulls
Ready to fit a new combination lock to your zipper pulls? First, align both pulls’ holes, thread the lock shackle through, and close to test fit. Set a temporary code, then confirm it opens and closes smoothly. Keep the default code until you’ve changed it securely.
| Step | Action |
|---|---|
| 1 | Thread shackle through zipper holes |
| 2 | Close and test mechanical fit |
| 3 | Set and confirm your combination |
Record your new code in a safe place, practice opening the lock a few times, and don’t force or overtighten the shackle.
Secure Non‑Locking Zippers on a London Fog Bag
Start by checking the zipper stops to make sure they’re intact and won’t slip off under tension. If the stops are weak, you can sew on threaded anchors to give the pull a secure point to hold cable or padlock attachments.
Then run a slim cable lock through the pulls and anchors to keep non‑locking zippers closed while you travel.
Inspect Zipper Stops
Before you attempt to reset the lock, examine the zipper stops to make certain the sliders can’t bypass them; these small metal or plastic pieces at the ends of the zipper track keep non‑locking zippers from being forced open and must be intact for the lock to work properly.
Check both ends of each zipper for cracked, bent, or missing stops. If a stop is loose, reshape it gently with pliers or replace it before resetting the lock.
Keep sliders aligned so the lock can engage. Confirming stops prevents easy bypass and ensures your reset secures the bag.
- Inspect ends for damage
- Tighten or replace stops
- Align sliders
Use Threaded Anchors
If your London Fog bag has non‑locking zippers, using threaded anchors gives you a simple, reliable way to secure them. You’ll thread a small anchor through both zipper pulls, tighten it, and deter casual opening without altering the bag. Choose anchors rated for luggage, match the diameter to zipper holes, and trim excess tail. Keep the anchor accessible for travel screening.
| Step | Tool | Benefit |
|---|---|---|
| Thread | Threaded anchor | Joins pulls securely |
| Tighten | Small wrench | Prevents easy opening |
| Trim | Cutter | Reduces snag risk |
Test before travel to ensure smooth operation.
Secure With Cable Locks
Threaded anchors work well for a tidy, permanent fix, but cable locks give you a faster, reusable option for non‑locking zippers on a London Fog bag. You’ll loop the thin cable through both zipper pulls, close the loop, and set the combination or keyed lock.
Choose a compact, flexible cable to avoid bulk and feed it through fabric grommets or pull tabs if anchors aren’t present. Cable locks deter opportunistic theft and keep compartments closed during transit, though they’re not TSA‑approved for checked bags.
Check the cable for frays regularly and store the key or combination separately.
- Quick to install and remove
- Reusable across bags
- Low bulk for travel
Add an External Lock or Luggage Tag as a Backup
As a practical backup, add an external lock or a durable luggage tag so you can secure or identify your bag even if the built-in London Fog lock fails.
Choose a small TSA-approved padlock for zippers or a cable lock that threads through handles; they give an alternate closure without altering your suitcase.
For ID, pick a tough, weather-resistant tag with a privacy flap and clear contact panel so lost-and-found staff can reach you.
Attach tags where they won’t catch on conveyors.
Keep spare keys or code notes in your carry-on.
Test attachments before travel to guarantee they stay fastened and visible.
Prevent Travel Delays From a Malfunctioning Lock
Before you leave, check your London Fog lock to make sure the combination turns smoothly and the shackle opens reliably. If you notice stiffness or sticking, reset or lubricate it now so you don’t get stuck at the airport.
Also carry a small backup tool like a TSA-approved cable or a compact shim so you can open your bag without causing damage.
Check Lock Before Departure
If your lock jams or the combination slips on the way to the airport, you could miss a flight, so check it well before you leave. You should test the mechanism, confirm the combination, and inspect for damage.
Try opening and relocking several times, listen for stiffness, and ensure dials align smoothly. If something feels off, address it at home rather than at the gate.
Note any wear that could worsen under stress or handling. Pack with the lock engaged only after testing.
- Test opening and closing multiple times
- Verify and rehearse your combination
- Inspect for cracks, bent shackle, or debris
Carry Backup Opening Tools
When a lock jams at the airport, you’ll want quick, reliable ways to open it without delaying your trip, so pack a small kit of backup tools and know how to use them. Bring a slim flathead, a tension wrench, a retractable cutter, and a pair of needle-nose pliers. Practice gently on a spare zipper lock to avoid damage. Store tools in checked luggage if TSA rules require. If you’re unsure, ask baggage staff for help rather than forcing the lock. Keep a note of combo resets and a contact for professional locksmith assistance.
| Tool | Purpose |
|---|---|
| Flathead screwdriver | Pry or depress tabs |
| Tension wrench | Apply rotational pressure |
| Retractable cutter | Trim stuck seals |
| Needle-nose pliers | Grip and pull small parts |
How Airlines and Security Handle Locked Luggage
Although you can lock your London Fog luggage for everyday travel, airlines and security agencies have specific rules about locked bags and how they’re handled during screening. You should expect inspections: if TSA or other authorities need to open your bag, they’ll either use approved universal keys (for TSA-approved locks) or cut noncompliant locks. You’ll be notified when feasible, but procedures vary by country and carrier.
Lock London Fog luggage, but expect inspections—use TSA-approved locks or risk cutters; policies vary by carrier and country.
To minimize issues, use accepted locks and follow airline guidelines before checking bags.
- Use TSA-approved locks to allow screened access
- Label bag with contact info for return
- Check carrier-specific locked-bag policies
Documenting Damage or Loss for Insurance Claims
Mistakes or forced openings by airport security can leave you with visible damage or missing items, so you’ll want to document everything right away for an insurance claim. Photograph damage from multiple angles, list missing items with approximate values, and keep receipts and boarding passes. Report the issue to the airline and get a written Property Irregularity Report (PIR). File your insurance claim promptly, include photos and the PIR, and note dates and names of contacts.
| What to record | Why it matters |
|---|---|
| Photos & angles | Proves condition |
| Receipts & PIR | Verifies ownership |
| Contact names | Tracks progress |
How to Teach Family Members Your Suitcase Code
Start by choosing one clear moment—like packing day or before a trip—to show family members the suitcase code and why it matters.
Explain when they’ll need it and who should have access.
Demonstrate opening and relocking the suitcase step by step.
Then confirm they can do it themselves.
Leave a secure written note in a designated family spot and set expectations about sharing.
- Show the sequence slowly and let them practice once.
- Agree who keeps the primary responsibility for the code.
- Decide on a safe place for a written reminder.
Keep it brief, practical, and repeatable.
Create Memorable but Secure Numeric Codes
When you pick a code, balance something you’ll remember quickly with enough randomness to deter guessing; use dates or sequences tied to personal cues but alter them (like adding or swapping digits) so they’re not obvious.
Choose a base pattern you can reconstruct mentally — a childhood street number plus a shift, or a memorable year with every other digit increased by two. Avoid obvious combos like birthdays, anniversaries, or 1234.
Test the pattern a few times so it sticks. If you need backups, store a hint, not the code, in a secure place only trusted people can access.
Quick Checklist to Reset and Test Before Travel
After you’ve picked a memorable-but-secure code, run through a short checklist to reset and test your London Fog lock so you won’t face delays at the airport. Set the dials to your chosen code, press the reset button or slide the lever, then release while keeping the code aligned.
After choosing a memorable code, reset your London Fog lock and test it carefully to avoid airport delays.
Close and scramble the dials, then re-enter your code to confirm it opens smoothly. Lock and unlock it a few times to ensure consistent operation. Store the code in a secure, accessible place.
- Verify the lock opens reliably
- Check zipper/tab alignment under tension
- Note the code in two secure spots
Troubleshooting Flow: If Reset Fails, Try This Next
If your London Fog lock won’t reset, don’t panic—work through a short troubleshooting flow to identify the problem and fix it quickly. First, confirm the dials align with the current code and apply steady pressure while turning the reset lever. If still stuck, try these steps:
| Step | Action | Result |
|---|---|---|
| 1 | Recheck code alignment | Moves freely? |
| 2 | Apply lubricant sparingly | Smoother motion |
| 3 | Cycle dials repeatedly | Release tension |
| 4 | Use small flat tool | Lever engagement |
| 5 | Inspect for damage | Needs service |
Follow outcomes logically; if none help, seek authorized support rather than forcing the lock.
How Much Professional Repair/Replacement Typically Costs
Typically, expect professional repair or replacement of a London Fog luggage lock to cost between $25 and $100 depending on complexity and parts.
Typically, professional repair or replacement of a London Fog luggage lock costs about $25–$100, depending on complexity.
You’ll pay less for simple combination resets or minor lock realignments; full lock swaps or replacing integrated zipper pulls cost more.
Labor rates, local market, and whether parts are OEM affect the final price.
Ask for an estimate before work begins and whether they warranty the repair.
- Simple service (reset, lubrication): $25–$45
- Partial replacement (mechanism only): $45–$70
- Full lock replacement or integrated unit: $70–$100
Find Qualified Luggage Repair Shops Near You
When you’re looking for qualified luggage repair shops nearby, focus on specialized bag and luggage repairers or cobblers who list lock and zipper work—they’ll have the right tools and experience to handle London Fog locks.
Check online reviews and photos of completed repairs to confirm quality. Call ahead to describe the lock issue and ask about parts availability, turnaround time, and warranty.
Prefer shops that offer on-site assessment so they can diagnose without guessing. If possible, choose businesses affiliated with luggage brands or professional associations.
Keep receipts and a written estimate before any work begins to avoid surprises.
What to Have Ready When Contacting London Fog Support
Before you contact London Fog support, gather the essential details so they can help you quickly: note your suitcase model/name and serial or style number (usually inside the bag or on a tag). Have the purchase date and receipt or proof of warranty ready. Describe the lock problem clearly (stuck, won’t reset, broken key).
Take photos or a short video showing the issue and any visible damage. You should also record your preferred contact method and any previous troubleshooting steps you’ve tried. Keep files accessible and concise to speed resolution.
- Model and serial number
- Photos/video of issue
- Proof of purchase or warranty
Warranty, Repair Options, and Contacting London Fog
Now that you’ve gathered your details and evidence, check your warranty and repair options so you know what support London Fog can provide. Review your purchase date, receipt, and warranty length—most warranties cover manufacturing defects, not wear or lost combinations.
If you’re within warranty, contact London Fog via their customer service page or phone. Provide model info, photos, and a clear problem description. They’ll advise repair, replacement, or authorized service centers.
If out of warranty, ask about paid repairs or parts. Keep all correspondence and service authorizations; they’ll help if you need escalation or credit card dispute support.
Frequently Asked Questions
Can I Retrofit a Tsa‑Approved Keyhole Into a Non‑Tsa London Fog Lock?
You can, but it’s tricky and risky: you’ll void warranties, may damage the lock, and could compromise security. You’d need specialized tooling or a locksmith to install a TSA‑style cylinder correctly and safely.
Are Combination Locks Covered Under London Fog’s Standard Warranty?
Yes, they’re covered only if the combination lock fails due to manufacturing defects within the warranty period; you’ll need proof of purchase and to follow London Fog’s claim process, though wear, misuse, or tampering aren’t covered.
Do Different London Fog Suitcase Styles Use Different Lock Manufacturers?
Yes, different London Fog suitcase styles can use various lock manufacturers, so you’ll find differing mechanisms and quality; check the product tag or manual, and contact customer service if you need specific brand or replacement details.
Is It Legal to Cut a Lock off at Airport Security Without Notification?
Yes, you can legally cut a lock after security inspects your bag, but TSA or local authorities might do it themselves. You should cooperate, document damage, and file a complaint if they didn’t notify you beforehand.
Can Humid Climates Accelerate Internal Lock Corrosion on Luggage?
Yes — humid climates can accelerate internal lock corrosion; moisture and salt in the air speed oxidation, so your lock’s internal springs and tumblers can seize or pit faster, reducing reliability and making resets or repairs harder.
Conclusion
Now you’re set to reset that London Fog luggage lock quickly and confidently. First confirm you’ve got a 3‑digit mechanical lock or note if it’s electronic; check the suitcase for model info and whether it’s TSA‑approved. If it’s stuck, weigh repair vs replacement—professional fixes often cost less than a new bag. Find qualified luggage repair shops nearby and have your purchase details ready before contacting London Fog support about warranty or repair options.