Do You Get Your Luggage Before or After Customs
Usually you’ll pick up checked luggage before you clear customs, but procedures vary by airport and itinerary. If you arrive from abroad you may pass immigration first, then collect bags and choose the green (nothing to declare) or red channel for inspection. On transfers some airlines tag bags through so you don’t reclaim them, while others make you recheck. Check your ticket and airport signs so you know what to expect — more specifics follow below.
What This Guide Covers and How to Use It

When you read this guide, you’ll get clear, practical advice on packing, declaring goods, and steering through customs procedures so you can travel with less stress and fewer surprises.
You’ll find straightforward sections that tell you what documents to carry, how to list items honestly, and which receipts to keep.
You’ll learn how to spot common pitfalls and prepare for inspections without panic.
Use checklists and brief examples to apply tips quickly.
Follow the sequence suggested so you don’t skip steps.
Quick Answer: Do You Get Your Luggage Before or After Customs?
Curious whether you’ll grab your bags before going through customs? Usually, you collect checked luggage before the customs checkpoint in countries where customs operates after baggage claim; you’ll then present your goods and declarations.
Curious whether you’ll collect checked bags before customs? Usually you pick them up at baggage claim for inspection.
In some places, especially when arriving from another country, you might go through immigration first and then retrieve bags for customs inspection.
Carry-on bags stay with you and may be inspected at customs or immigration. Check your arrival airport’s procedures beforehand—signage and airline staff can confirm.
If you’re connecting internationally, follow transfer instructions; you often won’t reclaim bags until your final destination.
Quick Steps to Take Right After You Land
After you step off the plane, take a deep breath and follow the signs for immigration, baggage claim, or transfers—your next steps depend on whether you’re on a domestic, international, or connecting flight.
Check your boarding pass or airport monitors to confirm your gate or baggage carousel.
If you’re connecting, locate transfer desks or tram signs and confirm whether you need to collect bags.
For domestic arrivals, head straight to baggage claim.
For international arrivals that require entry clearance, queue for immigration lines first.
Keep travel documents handy, note customs declarations, and move efficiently to your next point.
How International Arrival Flows Are Typically Organized
Although procedures vary by airport, international arrival flows are usually organized to move you from plane to exit through a few clear stages: disembarkation, immigration/passport control, baggage claim, and customs/exit or transfer.
You’ll leave the jetway, follow signs to immigration, queue for passport checks and possible questions, then proceed to the baggage hall.
Collect your checked bags at the designated carousel, check tags against your claim ticket, and head to customs. There you’ll either use green channels for nothing to declare or red for declarations and inspections, or follow transfer directions if connecting to another flight.
How to Tell Which Flow Applies to Your Flight
First, check whether your itinerary is domestic or international since that determines whether you’ll clear customs or not.
Then look at your ticket and airport signage for transit and connection rules—some international connections keep you airside, others require you to re-enter arrivals.
Finally, note any customs forms or signs on your flight or at the airport so you know if you’ll need to declare items.
Domestic Versus International
How can you quickly tell whether your flight follows a domestic or international luggage and customs flow? Look at origin and destination: same country means domestic, different countries means international, but check airport procedures.
- Check your ticket and itinerary for country codes or “nonstop” vs cross-border indicators.
- Review the airline’s arrival instructions—international arrivals often note customs and immigration steps.
- Inspect the airport’s website or signage for “Arrivals: Baggage Claim” versus “International Arrivals / Immigration.”
- Ask staff at check-in if you’ll collect bags before customs; they’ll confirm which flow applies to your trip.
Transit And Connection Rules
When you’re connecting through another airport, the key is to know whether your bags and passport stay with you or get processed at the transfer point—this determines whether you follow a domestic, international, or transit/customs flow.
Check your itinerary and ticket: if your baggage is checked through to final destination, you usually stay airside and follow transit procedures. If you must collect bags and recheck, you’ll clear customs and immigration at the transfer airport.
Also confirm with airlines on separate tickets, code-shares, or long layovers—these often require you to clear arrivals. Gate agents and transfer desks will confirm which process applies.
Customs Forms And Signs
Because customs controls hinge on whether you stay airside or pass through arrivals, spotting the right forms and signs quickly tells you which flow applies to your flight. Look for immigration booths, baggage belt icons, and arrows labeled “Arrivals” or “Transfer.”
If a customs declaration form is handed out or a kiosk appears before baggage claim, you’ll likely clear customs before collecting bags. Follow signage for “Nothing to Declare” or “Goods to Declare” to choose the right lane.
Ask staff if unsure — they’ll confirm whether you retrieve luggage before or after customs.
- Check arrival vs transfer signs
- Spot declaration kiosks/forms
- Watch baggage belt icons
- Ask airport staff
Immigration vs. Customs: What’s the Difference?
Curious about why you line up twice at the airport? You first meet immigration, where officers check identity, passport validity, and entry eligibility. That step decides whether you can enter the country.
After immigration, you collect your luggage. Then you approach customs, which inspects goods, enforces duties, and prevents prohibited items from entering.
Immigration is about people and legal entry; customs is about belongings and regulatory compliance. Knowing the distinction helps you follow directions and prepare documents.
Keep passports ready for immigration and receipts or declarations for customs so both processes go smoothly and you can move on with minimal delay.
Primary vs. Secondary Customs: What to Expect
If you land with goods to declare or raise a customs officer’s interest, you’ll usually go through primary screening first—where officers ask basic questions, check declarations, and decide if a deeper inspection is needed—then be directed to secondary for detailed searches, documentation checks, or interviews.
If arriving with goods to declare, expect primary questioning followed by possible secondary inspection, documents, and searches.
You’ll stay calm, answer clearly, and show requested paperwork. Primary is quick for routine checks; secondary is thorough and may involve x-rays, bag searches, or specialist officers.
Know your declarations and receipts to speed things up. Expect polite but firm procedures; compliance makes the process smoother.
- Document check
- Bag inspection
- Interviews
- Specialist review
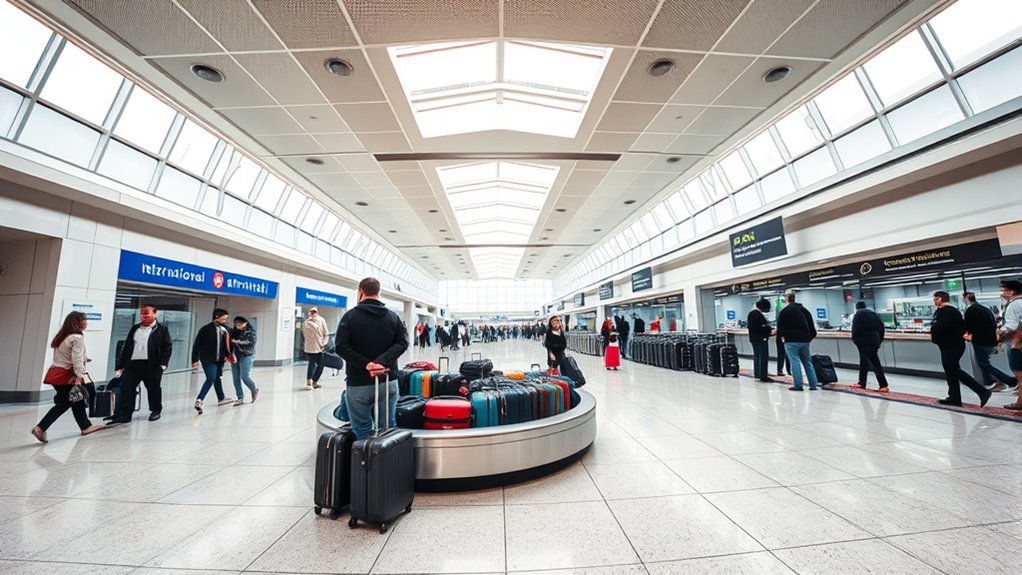
Baggage Reclaim Before Customs
Where do you pick up your luggage before facing customs? If baggage reclaim happens prior to the customs hall, you’ll collect bags at the arrivals carousel inside the secure zone. Follow signs to baggage claim, check monitors for your flight’s belt, and retrieve your luggage.
Keep travel documents and declarations handy—officers may approach in the reclaim area. If anything’s damaged or missing, report it immediately at the airline’s desk before leaving the zone.
After you’ve gathered luggage, proceed toward the customs inspection point with your belongings. Knowing this sequence helps you move smoothly through arrival procedures.
Baggage Reclaim After Customs
When baggage reclaim happens after customs, you’ll pass through passport control or a customs hall first and then follow signs to the arrivals area where carousels wait beyond the inspection point.
You’ll collect checked bags after any document checks or declarations, so have receipts and ID ready.
Expect officials to inspect luggage if they flag you; staying calm and cooperative speeds things up.
If officials flag your luggage for inspection, remain calm and cooperative to help the process move quickly.
Locate the correct carousel number on screens, watch belongings closely, and report missing bags promptly at the airline desk inside arrivals.
Pack essentials in carry-on to bridge delays and keep claim tags handy.
- Check signs
- Keep documents ready
- Stay cooperative
- Report missing bags
Carry‑On Only: When You Collect It Before Customs
If you’re traveling carry-on only, know the rules that let you keep your bag with you or require you to collect it before customs.
You’ll need to understand airport signage and airline instructions so you can access your bag in the pre‑customs area when that’s allowed.
Check procedures ahead of time so you won’t be surprised by where and when you have to pick up your luggage.
Carry‑On Only Rules
Arriving with only carry‑on bags usually speeds you through the airport, but it also changes when and how you’ll handle customs: in many countries you’ll clear immigration first and then collect checked baggage before customs. Yet with carry‑on only you’ll often pass directly through customs without a separate baggage claim step.
You should know rules vary by airport and entry type. Check size, prohibited items, and duty allowances. Be ready for random inspections and declare goods when required. Follow signage and officers’ instructions to avoid delays or fines.
- Check carry‑on size and weight limits
- Know prohibited items
- Declare dutiable goods
- Prepare for inspection
Pre‑Customs Bag Access
Because some airports route you through immigration before baggage claim, you might need to collect your carry-on from the carousel and then carry it through customs for inspection.
You’ll follow signs to reclaim the bag, then proceed to the customs area with your carry-on in hand. Keep documents handy and any declared items accessible; officers may ask to open your bag.
If you’ve only got a carry-on, packing strategically speeds the process. Know prohibited and duty‑free limits to avoid delays. If unsure, ask airport staff before leaving the carousel.
Staying organized helps you clear customs quickly and continue your journey.
Checked Bags: When They Reach the Carousel Before Customs
When your checked bag hits the carousel before you’ve cleared customs, don’t grab it and walk out—customs rules usually require you to present your luggage for inspection or declare items before leaving the secure area.
You’ll usually follow signage to a designated inspection lane; officers may ask you to open bags, show receipts, or remove specific goods. Cooperate, answer questions truthfully, and avoid moving your luggage past the inspection point.
If you have declared items, keep documentation handy. Failure to comply can lead to fines, delays, or seizure, so treat the process seriously and calmly.
- Expect inspection
- Show receipts
- Keep documents handy
- Comply promptly
Transit and Transfer Passengers: How Baggage Handling Differs
If you’re connecting flights, you’ll need to know each carrier’s baggage rules so you can tell whether your bags will be through-checked or need reclaiming.
At some airports you’ll stay airside and the airline transfers your luggage; at others you’ll pass customs, pick up your bags, and recheck them for the next leg.
Knowing the airport’s transit reclaim procedures ahead of time will save you time and stress.
Connecting Flights Baggage Rules
Although transferring between flights can feel straightforward, baggage rules change depending on whether you’re transiting (staying airside) or transferring (entering the country), and knowing the difference saves time and surprises.
You’ll usually have your bags checked through to your final destination on a single ticket, so you won’t claim them until you clear customs at that endpoint.
If you booked separate tickets or must change terminals landside, you’ll likely collect and recheck luggage, clearing customs if required by local rules.
Confirm with your airline and check ticketing to avoid missed connections or extra fees.
- Verify through-check.
- Confirm separate-ticket policy.
- Check terminal transfer type.
- Ask airline about customs obligations.
Airport Transit Reclaim Procedures
After you’ve checked whether your bags are through-checked or you’ll need to collect them between flights, know how reclaim works for transit versus transfer passengers so you can plan time and paperwork.
If you’re a transit passenger staying airside, you usually don’t reclaim baggage—airline handles transfer to the next flight, so you skip immigration and customs.
If you’re a transfer passenger who must pass landside (e.g., changing terminals or clearing immigration), you’ll reclaim and recheck luggage, clear customs, then check in again.
Always confirm at check-in and on boarding passes, allow extra time for recheck and security, and keep documents handy.
Through-Checked vs. Reclaimed
Wondering whether your bags will move with you or you’ll have to collect them between flights? You’ll usually get through-checked luggage when both flights are on one ticket and the airline transfers bags to the final destination.
If you booked separate tickets, you’ll probably reclaim and recheck. Rules vary by carrier, alliance, and country, so always confirm at check-in.
- Check your itinerary for “through-checked” or “checked to final destination.”
- Ask the agent to tag bags accordingly.
- Expect passport control if you must reclaim in a transit country.
- Allow extra time for reclaim and recheck.
Airline Policies That Affect Where You Pick Up Luggage
When you book a flight, the airline’s rules often determine whether you’ll pick up checked bags at your final destination or at a connecting airport. Knowing their policies ahead of time saves you time and stress.
Check whether the carrier offers through-checking to your final ticketed destination, because some airlines only tag bags to the first international stop.
Codeshare and interline agreements matter: even if one carrier sells your ticket, a partner may set baggage transfer rules.
Low-cost carriers frequently require you to reclaim and recheck bags between segments.
Confirm online or call customer service so you can plan customs and connection time accurately.
What Baggage Tags Tell You About Final Delivery Point
If you look closely at the small printed codes on your baggage tag, they’ll tell you where the airline intends to deliver your bag — not just the city, but sometimes the exact airport or final transfer point — so check the three-letter airport code and any routing markers before you leave the counter.
You’ll see codes like LHR, JFK, or a transfer point such as AMS. Read routing stickers (via, stopover) and priority tags. These details confirm final delivery and help you spot misroutes early.
- Three-letter destination airport code
- Via/transfer airport markers
- Priority or special-handling tags
- Airline internal routing numbers
How Connecting Flights Change Your Baggage Flow
Because your bag has to follow the same routing as you do, each connection adds handling steps and transfer points that change how and when your luggage moves, so you should check transfer tags and minimum connection times to avoid surprises.
When you connect, carriers may transfer baggage directly to the next aircraft or require you to recheck it, especially across airlines or after customs.
Short connections increase risk of misrouting or delayed bags. Confirm through-checked status at check-in, note tag destinations, and allow buffer time.
If a connection’s tight, request priority transfer or plan to claim and recheck if required.
When Small International Airports Differ From Major Hubs
Smaller international airports often handle baggage and customs very differently than big hubs, so you’ll want to adjust expectations after planning connections. You may collect bags airside or landside, face limited transfer desks, or clear customs immediately depending on layout and bilateral agreements. Staffing and signage can be minimal, so ask airline staff when unsure. Security procedures might be combined with immigration, speeding or delaying processing.
At smaller international airports, expect different baggage, customs, and transfer procedures—ask staff and confirm through-checks.
- Short terminal distances — faster transfers or forced recheck.
- Limited transfer desks — verify through-check policies.
- Variable customs locations — confirm if you’ll exit or stay sterile.
- Sparse signage — rely on staff help.
Arrivals at U.S. Airports: Luggage and Customs Procedure
When you land at a U.S. airport, you’ll follow a set sequence: deplane, go through passport control, collect checked baggage, and clear customs before exiting or making a domestic connection.
You’ll present your passport and CBP form or mobile submission at immigration, then retrieve checked bags from the carousel.
With luggage in hand, you’ll join the customs queue, declare items, and answer any officer questions.
Officers may inspect bags or direct you to secondary screening.
After clearance, you can exit or drop bags at a transfer desk for a domestic flight.
Follow signage and officer instructions to keep the process smooth.
Arrivals at EU Airports: Luggage and Customs Procedure
Arriving at an EU airport follows a similar flow to the U.S. but with some different steps and rules to watch for: you’ll disembark, follow signs to passport control (Schengen vs. non‑Schengen matters), collect any checked luggage, and then pass through customs.
Arriving at an EU airport: disembark, follow passport control signs, collect luggage, then pass through customs.
You’ll clear passport control first if arriving from outside the Schengen Area; after baggage reclaim, choose the green channel if you have nothing to declare or red if you do.
Be ready to show receipts for high‑value items and abide by duty‑free allowances between EU and non‑EU travel.
- Passport control first (if applicable)
- Collect luggage
- Choose green/red channel
- Carry receipts for valuables
Arrivals at the UK, Canada, Australia, and Other Common‑Law Systems
Although procedures vary by country, the UK, Canada, Australia and other common‑law systems follow a clear, traveler‑friendly pattern. You usually collect checked luggage before customs, then proceed through a customs channel—green if nothing to declare, red if you need to report items. Officers may inspect baggage after declaration.
| Step | What You Do |
|---|---|
| 1 | Follow signs to baggage reclaim and collect bags |
| 2 | Choose green or red channel based on declarations |
| 3 | Present bags and answers to officers if inspected |
This keeps the flow simple and lets you resolve issues before leaving the terminal.
Paying Duties and Taxes: When That Happens in the Arrival Process
If you owe duties or taxes, you’ll usually find out before you leave the terminal—either at the customs desk after declaring goods or at a dedicated payment counter nearby. You’ll present receipts, invoices, or declared items; an officer calculates fees based on value, allowances, and local rules.
You can pay by card, cash, or approved mobile methods, then get a receipt allowing exit. If you disagree, you can ask for a review but follow posted procedures. Keep documents handy until cleared.
- Have invoices ready
- Know duty-free allowances
- Use accepted payment methods
- Keep receipts for proof
How Customs Declaration Forms Affect When You Collect Bags
When you complete a customs declaration, it can change where and when you pick up your baggage. Filling forms online or on paper tells officers whether you have dutiable goods, restricted items, or nothing to declare.
If you declare items, you may be directed to collect bags from the arrivals carousel and proceed to a designated inspection area immediately.
If you declare nothing, you usually pick up luggage in the public area and exit through the green channel.
Accurate, timely declarations speed the process; mistakes can delay collection while staff verify contents or ask follow-up questions.
Red Flags That Trigger Secondary Inspection of Luggage
Because customs officers screen millions of bags, certain patterns and items will flag your luggage for secondary inspection. You might be stopped if anything looks suspicious, inconsistent, or risky.
Know common triggers so you can avoid delays and answer questions confidently.
- Unlabeled or irregularly packed containers that suggest hidden compartments.
- Large quantities of undeclared food, plants, or animal products.
- New, high-value items without receipts or inconsistent purchase histories.
- Travel patterns that raise questions: frequent short trips with expensive goods.
If selected, stay calm, be cooperative, and provide clear documentation to speed resolution.
How to Handle a Customs Seizure or Hold on Your Luggage
Although a seizure or hold on your luggage can feel intimidating, staying informed and acting promptly will help you resolve it more smoothly. First, remain calm and ask the officer for specific reasons, documentation, and contact info. Don’t sign anything you don’t understand; request a written receipt describing items taken.
Take notes: names, badge numbers, times, and questions asked. If your property’s retained, ask about appeal, storage fees, and retrieval procedures. Contact your airline and your country’s embassy or consulate if needed.
Later, follow written instructions to file petitions or claims and consult a customs attorney for complex cases.
What to Do If Your Bag Is Missing at the Carousel
If your bag doesn’t appear on the carousel, stay at the baggage area and report it immediately to the airline’s baggage service office—do this before leaving the airport so they can start a trace and issue a property irregularity report (PIR).
Give identifying details, show your baggage tag, and get a reference number. Ask about delivery options and compensation for essentials. Keep copies of all forms.
Provide identifying details, show your baggage tag, get a reference number, ask about delivery and compensation, and keep copies.
- Note the PIR reference and contact info.
- Provide a clear description and photo of your bag.
- Ask when and how updates will be communicated.
- Save receipts for emergency purchases and claimed losses.
Practical Steps to Prepare Your Luggage for Customs Checks
Once you’ve reported a missing bag and secured any necessary paperwork, turn your attention to packing and organizing the luggage you’ll bring through customs.
Place receipts, prescriptions, and declaration forms in an accessible pouch or the top compartment of your carry-on.
Separate items that may trigger questions—electronics, food, large amounts of cash—so you can present them quickly.
Use clear toiletry bags and avoid opaque containers for liquids.
Label fragile or high-value items visibly.
Keep a pen handy and note purchase dates if asked.
Stay calm and cooperative during inspections to speed the process and reduce complications.
Packing Checklist to Avoid Delays and Fines at Customs
When you’re packing to clear customs smoothly, prioritize items that often cause questions—declareable food, large sums of cash, alcohol, tobacco, and expensive electronics—and place them where officers can inspect them without unpacking everything.
Pack originals of travel documents, receipts for high-value goods, and prescription meds in your carry-on so you can present them quickly.
Follow this checklist to avoid delays and fines:
Follow this checklist to avoid delays and fines when passing through customs and inspections.
- Passport, visas, and import/export permits
- Receipts for expensive items and gifts
- Prescription medicines in labeled containers with notes
- Declared food, cash over limits, and restricted items separated for inspection
Tips for Smooth Customs Interviews and Inspections
Because customs officers value clear, honest answers, stay calm, speak plainly, and present documents or declared items promptly so the process moves quickly. You’ll answer questions directly, keep receipts accessible, and avoid jokes that confuse intent. Follow officer instructions, point to items when asked, and request clarification if you don’t understand. Remain polite; agitation can slow things. Know basic facts: purpose, length, and value of goods. If selected for inspection, cooperate and watch the search. Keep copies of declarations and contact info handy to resolve errors.
| Before interview | During inspection |
|---|---|
| Documents ready | Follow directions |
| Declarations clear | Point to items |
How to Use Global Entry, E‑Gates, and Trusted Traveler Programs
If you want to speed through arrivals after a clear customs interview or inspection, enroll in a trusted traveler program or use e‑Gates and Global Entry kiosks where available. You’ll apply online, pass a background check, and attend an interview for approval.
At arrival, follow signs to the dedicated lanes or kiosk, scan your passport or card, answer the declaration questions, and get a receipt. Keep documents handy and declare items honestly.
At arrival, use the dedicated lane or kiosk, scan ID, answer declarations, get your receipt—keep documents ready and declare honestly.
Programs vary by country, so check eligibility, fees, and renewal rules before travel. Enjoy faster processing, but always comply with customs instructions.
- Apply online and book interview
- Use dedicated lanes or kiosks
- Scan ID, answer declaration, get receipt
- Check eligibility, fees, renewals
Special Rules for Food, Plants, and Restricted Items
Although you can bring some snacks and souvenirs, many countries tightly regulate food, plants, and related items, so declare everything and check restrictions before you travel. You’ll often need to present perishables, seeds, soil, and animal products at inspection.
Undeclared or prohibited items can be seized, fined, or cause quarantine. Pack commercially sealed, clearly labeled goods and keep receipts for purchased specialty foods.
If in doubt, trash items before arrival or contact the destination’s agriculture or customs website for guidance. Remember medicines and supplements may need prescriptions or permits—carry documentation and declare them to avoid delays or penalties.
Traveling With Duty‑Free Purchases: Where to Claim and Pay
When you arrive, declare any duty‑free goods at the customs checkpoint and follow the signs or officer instructions for the correct lane.
If duty is due, you’ll pay at the designated counter or as directed by customs before exiting.
Collect any purchases held for inspection or payment from the customs office or the specified collection point once clearance is complete.
Where To Declare
Because duty‑free items can still trigger duties or restrictions, you should declare them at the first customs point you reach after arrival — typically the red/“Goods to Declare” channel or the primary inspection booth — and have receipts and any tax‑free forms ready to show.
When you declare, be specific: list alcohol, tobacco, high‑value goods, and gifts. Keep items accessible in carry‑on or retrieved luggage. Follow officer instructions; they may inspect or ask questions. If unsure, declare anyway—failure to declare can lead to fines or confiscation.
Clear documentation speeds processing and avoids misunderstandings.
- Alcohol and tobacco
- Electronics and jewelry
- Gifts and samples
- Receipts and forms
Paying Duty Charges
After declaring any items, you’ll need to know where and how to pay applicable duties or taxes for your duty‑free purchases.
At many airports, payments happen at the customs desk or a designated payments counter before you leave the controlled area. Have your declaration form, receipts, and passport ready so officers can calculate charges quickly.
You can usually pay by card or cash; some countries accept only local currency. If an online prepayment option exists, use it to speed processing.
Ask staff if you qualify for exemptions or refunds, and keep receipts in case of later queries.
Collecting Purchases After Customs
Although you usually declare and pay duties before leaving the controlled area, you may need to collect certain duty‑free items after passing customs — so know where to pick them up and what proof you’ll need.
You’ll often retrieve purchases at a post‑customs counter or airline desk; sometimes items are delivered to your gate. Keep receipts, vouchers, boarding pass, and ID handy.
If duties apply, pay at the designated point promptly to avoid fines. If an item is withheld, follow instructions to clear it.
Ask staff for directions and timelines so you don’t miss pickup windows.
- Receipt or voucher
- Boarding pass
- Photo ID
- Payment method
How to Find Airport Maps and Arrival Hall Layouts Before You Land
If you want to move quickly through arrivals, check airport maps and arrival-hall layouts before you land so you know where immigration, baggage claim, and ground transport are located. Use official airport websites, terminal guides, and airline apps to preview routes, transfer times, and elevator/escalator positions. Save screenshots or download PDFs for offline access. Note security checkpoints and accessible-path icons. Compare terminal maps if you have a connection.
| Source | What to look for |
|---|---|
| Airport website | Terminal map, services |
| Airline app | Gate, transfer info |
| Maps app | Walking time estimates |
| PDF guide | Printable backup |
Questions to Ask Airline and Airport Staff on Arrival
Knowing the layout before you land will save time, but you’ll still want to ask a few targeted questions of airline and airport staff when you arrive. Approach a desk or uniformed worker and be direct: confirm where to collect checked bags, whether you clear customs before or after baggage claim, and which signs to follow.
Ask about any special lanes for transfers or priority passengers, and whether immigration lines are currently long. If your baggage is delayed, get a reference number and where to report it. Clear, specific questions speed you through arrival and reduce stressful guessing.
- Where’s baggage claim?
- Do I clear customs before or after collecting luggage?
- Any priority or transfer lanes now?
- How do I report delayed baggage?
Quick Reference: Checklist for Collecting Luggage and Clearing Customs
Before you leave the terminal, follow a short checklist to grab your bags and clear customs without delays: locate your baggage carousel, confirm whether customs comes before or after claim, have your passport and declaration form ready, and look for any priority or transfer lanes.
Before leaving the terminal, locate your baggage carousel, prep passport and declaration, and check for priority or transfer lanes.
Then: check bag tags match your destination, note oversized or fragile handling, collect carry-ons, and inspect baggage for damage.
Follow signs to the correct customs area, declare restricted items, and keep receipts for new purchases.
If you’re connecting, verify transfer procedures and recheck times.
Stay calm, ask staff if unsure, and move efficiently through queues.
Frequently Asked Questions
Can I Leave the Airport With Airport‑Screened Luggage but Before Immigration Clearance?
No, you can’t leave the airport with screened luggage before immigration clearance; you’ll need to clear immigration and customs first, then reclaim your bags and exit, unless specific airline or country exceptions explicitly allow it.
Do Ride‑Share Drivers Ever Access Baggage Claim Areas to Meet Passengers?
Sometimes, but it’s rare; airports usually restrict baggage claim access to authorized drivers or meet‑and‑greet services. You’ll typically meet drivers in designated curbside or pickup zones outside the secure area after you collect your luggage.
Are There Insurance Claims Processes for Customs‑Damaged Items?
Yes — you can file claims for items damaged by customs inspections; you’ll need to document damage, save receipts, get a written inspection report from customs, then submit to the carrier or insurer promptly and follow their specific claim procedures.
Can Customs Force Me to Open Locked Electronic Devices for Inspection?
Yes — customs can require you to unseal electronic devices for inspection in many countries; you’ll need to comply or face seizure, fines, or refusal of entry, though specific powers and legal protections vary by jurisdiction.
Do Airlines Reimburse Fees for Customs‑Related Baggage Delays or Inspections?
Generally, you won’t get reimbursed automatically; airlines rarely cover customs‑related delays or inspections. If you incur fees, you should file a claim with the airline and your travel insurance; keep receipts and documentation for support.
Conclusion
In most cases you’ll collect checked bags before clearing customs—so expect to grab your luggage at the baggage claim, then head to the customs area for inspection and declaration. Follow signs and crew instructions, have documents ready, and know whether your arrival is into an international or sterile zone (some airports route you differently). If you bought duty‑free or have items to declare, be prepared to show receipts and pay duties before exiting the arrival hall.