How to Pack Food in Checked Luggage Without Issues
You can pack food in checked luggage if you pick nonperishables, seal them well, and follow airline and customs rules. Use sturdy containers, vacuum or heavy-duty bags, and cushion jars to prevent breakage. Keep strong smells double-wrapped or with charcoal sachets, and use insulated, leakproof packs plus coolant for perishables you must bring. Declare restricted items and know destination bans to avoid fines or confiscation. Keep labels and receipts handy, and continue for practical tips and checklists.
Quick Answer: Can You Pack Food in Checked Luggage?
Although rules vary by country and airline, you can generally pack most solid, nonperishable foods in checked luggage.
You should dry-pack items, seal them in sturdy containers or vacuum bags, and cushion fragile jars to prevent breakage.
Keep strong-smelling foods wrapped to avoid odor transfer.
Check destination rules beforehand, label homemade items, and expect inspections that might dispose of prohibited agricultural products.
Airline & Customs: Allowed vs. Prohibited Food
Now that you know general packing tips, you’ll also need to understand what airlines and border authorities will allow you to bring. You should declare perishables and restricted items, pack sealed commercial goods, and avoid fresh produce or meats where banned. Check airline policies and customs rules before travel to prevent fines or confiscation.
| Allowed | Restricted | Prohibited |
|---|---|---|
| Sealed snacks | Dairy | Fresh fruit |
| Canned goods | Plants | Meat products |
International vs. Domestic Rules for Packing Food
When you fly domestically, rules tend to be simpler—airlines usually allow sealed, nonperishable items with few extra steps—while international travel brings different customs laws, quarantine checks, and often stricter bans on fresh foods and animal products.
You should research destination rules, declare required items, and pack documentation.
Failure to declare or follow import rules can lead to fines, confiscation, or delays at arrival.
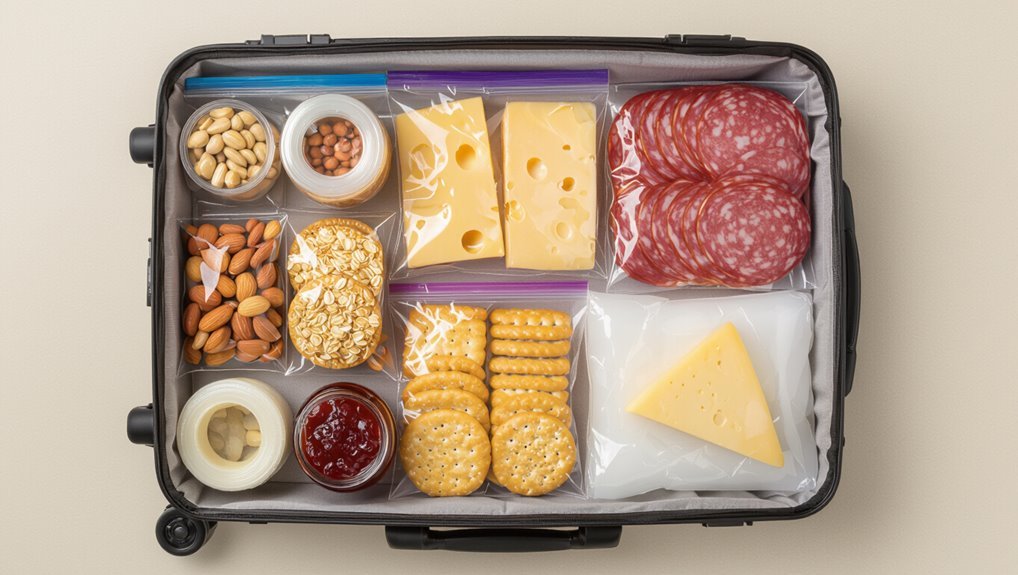
Choosing Foods to Pack in Checked Luggage
Pick foods that survive handling, temperature changes, and delays: sturdy, nonperishable items like vacuum-sealed snacks, hard cheeses that tolerate a day or two without refrigeration, dried fruits, nuts, and canned goods travel best in checked bags.
Choose single-serving, well-sealed items, avoid fragile packaging, pack powders in clear containers, and check airline and destination restrictions before you leave.
Preventing Spoilage: Temperature and Perishability Tips
Because checked bags can sit in warm cargo holds or be delayed on tarmac, you should plan for temperature swings and perishable limits: prioritize items that tolerate a day or two without refrigeration, use insulated containers or gel packs for borderline perishables, and separate foods that will spoil quickly.
Label perishables with dates, keep dry goods sealed, and avoid highly temperature-sensitive ingredients or prepared meals.
Storing Cheese, Meat, and Other Animal Products Safely
When you pack cheese, meat, or other animal products, seal them in leakproof, insulated containers to keep them cold and avoid odors.
Keep raw and ready-to-eat items separated and use sturdy packaging to prevent juices from contaminating other foods.
Also check airline and destination rules for allowed items and declare anything required to avoid fines or confiscation.
Packing Animal Products Properly
If you’re bringing cheese, cured meats, or other animal products in checked luggage, pack them to stay cold and sealed so they won’t spoil, leak, or contaminate other items.
Wrap portions in airtight bags, double-bag liquids or marinades, and place items in insulated containers with frozen gel packs.
Label contents and use sturdy containers to prevent crushing or punctures during transit.
Preventing Cross-Contamination
To prevent cross-contamination, pack cheese, cured meats, and other animal products in fully sealed, leak-proof containers or double-bagged vacuum bags so juices can’t touch other items. Label containers, isolate them in a dedicated cooler or hard-sided box, and place absorbent pads. Clean hands and surfaces after handling.
| Item | Storage tip |
|---|---|
| Cheese | Sealed wrap |
| Cured meat | Vacuum bag |
| Raw poultry | Separate box |
| Leftovers | Absorbent pad |
| Packaging | Label clearly |
Complying With Airline Rules
Although rules vary by carrier and destination, you should always check airline and country-specific regulations before packing cheese, cured meats, or other animal products in checked luggage.
You’ll also verify agricultural bans, declare items, and package for temperature control.
Follow these steps:
- Confirm import/export rules.
- Declare items on forms.
- Use airtight, insulated packaging.
- Label contents and keep receipts.
Insulation and Cooling: Keeping Perishables Cold
When you’re packing perishables in checked luggage, the priority is keeping them cold long enough to stay safe and fresh; that means using layered insulation, adequate coolant, and a plan for transit time.
Use frozen gel packs or dry ice where allowed, surround items with insulating materials, minimize air gaps, and pack perishables centrally.
Monitor total transit duration and replace coolant if delays threaten safety.
Best Containers: Rigid Boxes, Vacuum Seals, and Jars
You’ll find rigid boxes protect fragile items and stack well in your suitcase, so pick ones with tight lids and sturdy seams.
For vacuum seals, make sure you remove as much air as possible and use food-safe bags to prevent leaks and freezer burn.
Combining a rigid outer container with vacuum-sealed packets gives the best protection and space efficiency.
Rigid Container Pros
Rigid containers give you the best protection for checked food, keeping fragile items from crushing and liquids from leaking into your luggage.
You’ll prevent odors, stabilize jars, and simplify inspections. Choose sturdy plastic or metal, seal lids tightly, and pad gaps with cloth.
- Impact resistance
- Leak containment
- Stackable organization
- Easy inspection access
Vacuum Seal Tips
If you want maximum protection beyond sturdy boxes, vacuum-sealing offers airtight compression that keeps food fresher and prevents spills. Use high-quality bags, leave headspace for expansion, and double-seal wet items inside zip bags. Label contents and date. Consider a portable sealer for trips.
| Tip | Benefit |
|---|---|
| Double-seal | Backup spill protection |
| Label | Easy identification |
| Headspace | Prevents bag rupture |
Wrapping Liquids, Sauces, and Oils to Prevent Leaks
Because even a small spill can soak clothes and ruin other items, wrap liquids, sauces, and oils tightly before packing them in checked luggage.
Even small spills can soak clothes and ruin items — wrap liquids tightly before packing them in checked luggage.
Seal lids, use tape, and double-bag with heavy-duty ziplocks. Cushion bottles away from seams and sharp edges. Place in a waterproof outer bag for extra containment.
- Tighten lids
- Tape seals
- Double-bag
- Cushion bottles
Packing Fragile or Crushable Foods Securely
Think of fragile foods—eggs, pastries, whole fruits—as items that need a protective shell and cushioning; you’ll want to pack them so they can’t shift, crush, or rub against hard surfaces.
Use rigid containers or hard-sided boxes, surround items with bubble wrap, foam, or clothing, and immobilize with packing tape.
Label “fragile” and place them atop heavier items to minimize pressure.
Packing Baked Goods, Snacks, and Dry Staples for Long Trips
After protecting fragile items, focus on baked goods, snacks, and dry staples that need durability and moisture control for long trips.
Pack in airtight, crush-resistant containers and include silica gel or desiccant packs.
Use airtight, crush-resistant containers and toss in silica gel or desiccant packs to keep snacks dry and intact.
Keep cookies and crackers layered with parchment.
Seal cereal, nuts, and rice in vacuum bags to save space and prevent pests.
- Airtight containers
- Desiccants
- Layering
- Vacuum bags
Labeling and Declaring Food for Airlines and Customs
When you pack food in checked luggage, label containers clearly and know which items you must declare to airlines and customs: fresh produce, meats, dairy, and large quantities of pantry staples often have restrictions or require inspection.
Check destination and airline rules, list items on declaration forms, keep receipts and ingredient lists accessible, and be honest at checkpoints to avoid fines, delays, or confiscation.
Preventing Odors, Pests, and Contamination in Transit
Seal foods tightly in airtight containers or heavy-duty freezer bags to keep spills and smells contained.
Use odor barriers like vacuum sealing or double-bagging with activated charcoal packs to stop strong scents from escaping.
Protect packages from pests by wrapping in sturdy luggage, adding rigid containers, and avoiding organic debris that attracts insects.
Seal Foods Tightly
Keep food airtight to stop smells, leaks, and insects from ruining your bag and belongings.
You’ll seal jars, wrap cheeses, and vacuum-pack meats to prevent contamination and pests.
Label packages with contents and date, and double-bag fragile items.
Compress soft foods to save space and reduce movement during transit.
- Vacuum-seal
- Zip-top double-bag
- Rigid containers
- Tamper-evident wraps
Use Odor Barriers
If you want to stop smells and pests from spreading through your checked bag, pack foods inside odor-barrier materials like mylar bags, activated-charcoal pouches, or resealable vacuum pouches.
Seal each item, squeeze out air with a hand pump or vacuum sealer, and label contents.
Use multiple layers for strong odors and include absorbent packets to trap moisture and slow spoilage during transit.
Protect From Pests
Anyone can attract unwanted critters when food’s tucked into checked luggage, so you’ll want to make prevention a priority before you close the bag.
Seal perishables, use sturdy containers, and clean spills immediately. Follow these steps:
- Double-bag strong-smelling items in vacuum bags.
- Place repellant packets or cedar near food.
- Store containers in hard-sided cases.
- Inspect luggage on arrival for signs of pests.
Troubleshooting at Check-In and Arrival + Packing Checklist
One quick scan at check-in and a calm approach on arrival can save you time and headaches when traveling with food in checked luggage.
If an agent questions items, stay polite, show receipts or labels, and offer to discard perishables.
On arrival, inspect packaging, repack damaged containers, and declare restricted items.
Packing checklist: airtight containers, absorbent material, cooler packs, labels, receipts, and a small waste bag.
Frequently Asked Questions
Can I Pack Homemade Baby Food in Checked Luggage?
Yes — you can pack homemade baby food in checked luggage, but you’ll need to follow airline and country rules, seal jars well, keep foods nonperishable or frozen, declare per customs, and expect possible inspection or disposal.
Will Packing Food Affect My Checked Baggage Weight Limit?
Yes — extra food counts toward your checked baggage weight, so you’ll need to weigh it and account for it to avoid overage fees; pack smartly, prioritize dense items, and shift heavy jars to carry-on if allowed.
Are There Restrictions for Powdered Milk or Protein Powders?
Yes, there are restrictions. You’ll face limits for powders in carry-ons (typically 12 oz/350 mL) and may need to declare larger amounts in checked luggage; airline and country rules vary, so check specific carrier and destination policies.
Can I Pack Alcoholic Food Items Like Rum Cake or Extracts?
You can pack alcoholic food items like rum cake or extracts, but you’ll need to follow airline and country alcohol limits, declare when required, guarantee bottles are sealed and cushioned, and avoid countries that prohibit alcohol import.
Do Airlines Inspect Sealed Commercially Packaged Foods?
Yes — airlines and security may inspect sealed commercially packaged foods during screening or if customs asks; they’ll open items if needed. You should label contents, keep receipts, and declare anything restricted to avoid delays or confiscation.
Conclusion
You can pack food in checked luggage, but you’ll need to plan ahead. Check airline and destination rules, avoid prohibited fresh produce and meats for international travel, and choose shelf-stable or well-sealed items for long trips. Keep perishables chilled with cold packs for short durations, wrap foods to prevent leaks and odors, and declare anything required at customs. Label containers, use airtight packaging, and pack a simple checklist to ease check-in and arrival.