How to Fix Broken Luggage Wheel Step by Step
You can usually fix a broken luggage wheel quickly: flip the bag, lock the handle, roll and wiggle each wheel to diagnose loose axles, debris, or cracked hubs, then tighten screws, clean and lubricate bearings, or swap a damaged wheel for a matching spare; use epoxy or rivets for cracked mounts and shims for wobble. Keep a small toolkit and spare parts for travel. Continue for step‑by‑step guidance and part selection tips.
Quick Fix vs Full Wheel Replacement: How to Decide
When deciding between a quick fix and a full wheel replacement, start by evaluating the damage and how you use the suitcase.
If the wheel’s loose or the axle’s dirty and you travel infrequently, try a simple tighten, lubricant, or adhesive.
If the hub’s cracked, bearings fail, or you depend on smooth travel, opt for a proper replacement to restore reliability and safety.
Diagnose the Problem Fast: Roll, Wobble, or Stuck Wheel
You’ve weighed quick fixes versus full replacement; now check how the wheel behaves to pinpoint the fault.
Roll it on a smooth surface—note grinding, uneven resistance, or free spin.
Wiggle side-to-side to detect axle looseness or cracked housing.
Try spinning by hand to see if bearings bind.
Identify whether problem is debris, loose parts, or internal failure before proceeding.
Measure and ID Your Luggage Wheel System
Next, you’ll identify the wheel type—spinner, inline, or castor—and note how it attaches to the suitcase.
Measure the wheel diameter, axle length and diameter, and mounting plate or stem so replacement parts will fit.
Keep those specs handy when you shop for spare wheels or order replacements.
Wheel Type Identification
Start by taking a close look at the wheel assembly and measuring key dimensions so you can identify which replacement parts you need.
Note whether wheels are inline skate-style, swivel caster, fixed, or dual-wheel spinners.
Check axle type (bolt, rivet, snap-fit), bearing presence, and mounting bracket shape.
Photograph the assembly for reference when sourcing compatible replacements.
Measurement And Fit
Before ordering parts, measure the wheel system precisely so replacements fit without rework. You’ll record exact dimensions and match mounting types to avoid returns.
Check bearings, axle length, wheel diameter, and bracket spacing. Use calipers and photos for reference.
- Wheel diameter and width
- Axle diameter and exposed length
- Bearing type and inner diameter
- Mounting bracket spacing and hole pattern
Identify Common Wheel Problems at a Glance
Start by spinning each wheel to see if it turns freely—if it sticks or doesn’t move, you likely have a seized axle or debris jam.
Inspect for visible cracks, missing chunks, or a split rim that show the wheel is cracked or broken.
These quick checks tell you whether you need cleaning, axle repair, or a full wheel replacement.
Wheel Won’t Spin
When a luggage wheel won’t spin, you can usually spot the issue quickly by checking for visible damage, debris, or misalignment; give the wheel a quick tug and spin to see if it stays stuck, wobbles, or grinds.
Then inspect nearby parts and try simple fixes:
- Clear hair, string, or dirt from the axle.
- Tighten loose screws or nuts.
- Lubricate bearings lightly.
- Check for bent axle alignment.
Cracked Or Broken Wheel
If your wheel still spins but shows visible cracks, or if it’s chipped, split, or missing chunks, you’ve got a structural failure rather than a simple snag or lubrication issue.
Don’t keep using it; replace the wheel or entire assembly. Inspect mounting hardware and axle for damage, note wheel size/type for a proper replacement, and consider professional repair if the hub or bearing is compromised.
Quick On‑The‑Road Fixes for Airport Emergencies
Although you can’t always avoid a wheel failing mid‑trip, you can usually get rolling again with a few simple tools and quick fixes.
Act fast: stabilize the bag, jury‑rig a temporary spacer, and wheel it to a repair desk.
Try these quick fixes:
- Tape loose wheel parts
- Use zip ties as makeshift axles
- Stuff fabric as a temporary bearing
- Swap to a single‑wheel carry mode
Gather Essential Luggage Wheel Tools
One compact toolkit will save you time and stress when a wheel gives out mid‑trip.
One compact toolkit can spare you time and stress when a wheel fails mid-trip.
Pack a screwdriver set (Phillips and flat), adjustable wrench, pliers, hex keys, and a small hammer or mallet.
Add zip ties, a few heavy-duty rubber bands, lubricant spray, and a flashlight.
Keep tools in a zip pouch so you can reach them quickly.
Collect Likely Replacement Parts Before You Start
Now that you’ve packed a compact toolkit, you’ll want to gather the replacement parts that actually fix the wheel.
You’ll need exact matches to avoid wobble or failure. Check the axle, wheel, bearing, and mounting hardware sizes before starting.
- Replacement wheel
- Axle pin or bolt
- Bearings or bushings
- Mounting screws and washers
Prepare Your Suitcase Safely for Repairs
Before you start, flip the suitcase upside down on a clean, flat surface and lock the telescoping handle so it won’t extend while you work.
Empty all pockets and remove loose items. Unzip compartments to prevent catches.
Lay out a towel to protect the shell and catch screws. Gather tools nearby, wear gloves and eye protection, and guarantee good lighting and stable footing.
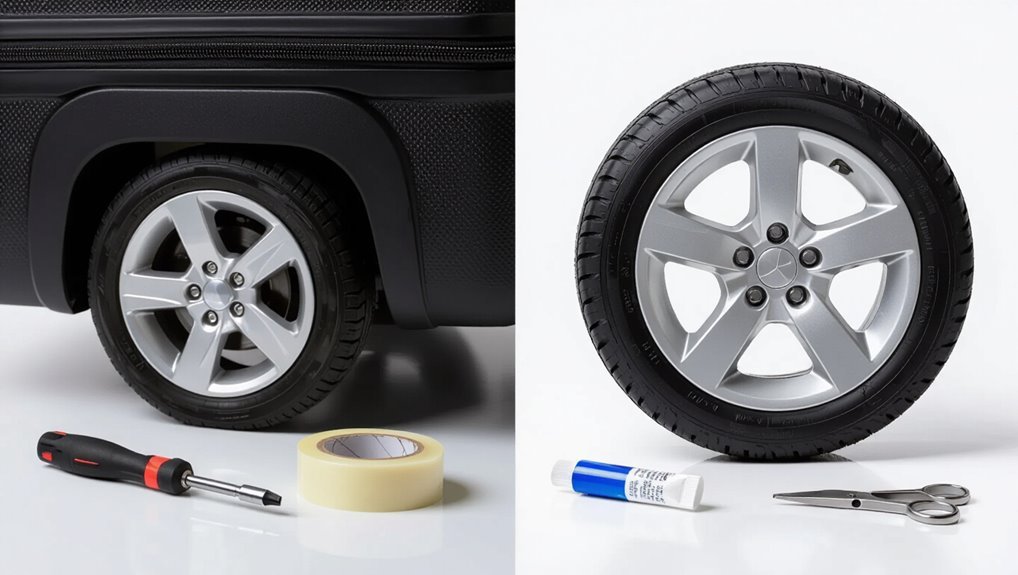
Remove a Damaged Wheel Assembly
Start by removing any external fasteners like screws or rivets that hold the wheel in place, using the appropriate screwdriver or drill bit.
Once the fasteners are out, gently detach the wheel housing from the suitcase frame, watching for hidden clips or wiring.
Keep the removed parts organized so you can match them when installing the replacement.
Remove External Fasteners
Grab the right screwdriver or wrench and loosen the screws or bolts that hold the damaged wheel assembly to the luggage frame.
Keep tension controlled and support the wheel while you work so it won’t drop.
- Inspect fastener heads for stripping
- Use penetrating oil on seized bolts
- Swap bits to fit precisely
- Collect removed hardware in a labeled container
Detach Wheel Housing
Loosen any remaining clips or retainers and lift the wheel housing away from the luggage frame, supporting the assembly as you work so it doesn’t fall.
Set the damaged housing on a padded surface.
Inspect mounting points, note broken tabs or stripped screws, and remove any remaining fasteners.
Keep small parts organized for replacement, and clean mating surfaces before installing the new wheel assembly.
Inspect Wheel Axle and Bearings for Wear
Before reassembling the wheel, inspect the axle and bearings for visible wear, corrosion, or play—these parts take the most stress and often reveal the root cause of wobbling or grinding.
You’ll check, clean, and decide if replacement is needed. Consider these steps:
- Look for scoring or bent axle
- Spin bearings to feel roughness
- Clean grease and debris
- Measure play with a probe
Check Wheel Housing and Mounting Points for Cracks
Check the wheel housing edges for any chips or deformities that could stress the wheel.
Inspect the mounting points carefully to make sure they’re still solid and not pulling away from the case.
Use good light to look for hairline cracks that mightn’t be obvious at first glance.
Inspect Wheel Housing Edges
Start by closely examining the wheel housing edges and the nearby mounting points for hairline cracks or missing chunks, since these are common failure spots that’ll affect repairability.
You’ll want to note size, location, and whether edges are jagged or smooth.
- Look for stress lines along seams
- Check for plastic delamination
- Feel for looseness under pressure
- Photograph damage for reference
Check Mounting Point Integrity
Now you’ll want to test each mounting point and the wheel housing for hairline cracks or separations by applying firm pressure and rotating the wheel to expose stress areas; if a crack opens or flexes, the assembly likely needs reinforcement or replacement.
Check screw bosses, rivet seats and surrounding plastic or metal for deformation.
Note stripped threads, loose fasteners or movement; mark damaged areas for repair.
Look For Hairline Cracks
After you’ve marked any damaged fasteners or flexing areas, inspect the wheel housing and mounting points closely for hairline cracks that won’t be obvious at a glance.
You should:
- Run a fingernail along seams to feel snags.
- Use bright light and magnifier for visibility.
- Wiggle the wheel while observing gaps.
- Tap gently with a coin to hear dull tones indicating fractures.
Fix Loose Screws and Stripped Threads
Loose or stripped screws are one of the easiest wheel problems to fix, and you can often get them working like new with just a few simple tools.
Grab a screwdriver, thread locker, or a slightly larger screw.
For stripped threads, use a helicoil, epoxy fill with a re-tap, or switch to a self-tapping screw.
Tighten firmly, avoid overtorque, and test rotation.
Rebond or Rivet Wheels Pulled Off the Shell
First, assess how much of the wheel and shell are damaged so you know whether rebonding will hold.
If the bond area is clean and intact, you’ll choose an appropriate rebond method; if it’s torn or thin, plan to secure the wheel with rivets.
Whichever route you take, make sure the attachment is reinforced to prevent the wheel from pulling off again.
Assess Damage Extent
When a wheel has been pulled off the shell, start by inspecting how it detached — did the rivet hole tear through the plastic, or is the wheel assembly still intact but separated from its bond?
You’ll then evaluate repairability and needed parts. Consider:
- Assess plastic tear size and edges
- Check rivet integrity and spare type
- Examine wheel bearings and axle
- Note shell deformation and surrounding cracks
Choose Rebond Method
Before you start a repair, decide whether you’ll rebond the wheel to the shell with adhesive or reinstall it using a rivet—the choice depends on the tear size, material thickness, and how much load the wheel will bear. If bonding, pick flexible epoxy or polyurethane; prep surfaces, clamp, cure fully. Quick reference:
| Method | Strength | Best when |
|---|---|---|
| Adhesive | Medium-High | Clean tear, thin shell |
| Temporary | Low | Low-stress travel |
Secure With Rivets
If adhesive won’t hold or the shell’s torn too badly, you’ll want to secure the wheel with rivets for a more mechanical, long-lasting fix.
You’ll drill clean holes, align the wheel plate, and use solid rivets or pop rivets to clamp parts tight.
Follow these steps:
- Mark hole positions precisely
- Drill pilot holes slowly
- Fit wheel plate and rivet
- Trim/counterbore cleanly
Replace a Cracked Wheel With a Compatible Spare
Since a cracked wheel can make your suitcase awkward to roll and risk further damage, you’ll want to swap it out for a compatible spare as soon as possible.
First, check wheel size, axle type and mounting style. Remove the damaged wheel, transfer any spacers or washers, fit the spare, and secure fasteners tightly.
Test roll; adjust if wobble remains.
Swap an Inline‑Skate Style Wheel and Bearing
Grab a replacement inline‑skate style wheel and the matching bearing before you start, because these wheels mount and spin differently than molded suitcase casters.
Remove the axle, press out the old bearing, fit the new bearing into the wheel, and reassemble. Check alignment and spin freely.
- Use correct bearing size
- Press, don’t hammer
- Grease sparingly
- Tighten axle securely
Repair a Spinner Wheel That Won’t Rotate Freely
Replacing an inline‑skate style wheel and bearing helps when a caster is damaged, but spinner wheels that won’t rotate freely usually need a different approach.
First, remove debris and hair from the axle and wheel hub. Lubricate bearings with a few drops of light oil or bearing grease.
Tighten or replace loose axle hardware, spin to test, and reassemble.
Replace Recessed or Hidden Wheels on Hard Shells
First find the hidden wheel access—check seams or a removable panel on the shell.
Then remove the old wheel assembly by unscrewing or unclipping it, keeping fasteners organized.
Finally, snap or screw in the replacement wheel and test for smooth rotation.
Locate Hidden Wheel Access
Many hard-shell suitcases hide their wheel mounts behind recessed panels or snap-in covers, so you’ll want to inspect the shell’s seams and interior lining to find access points before you start removing anything.
Check for:
- Small screws under fabric flaps
- Plastic tabs along molded edges
- Zippered pockets hiding panels
- Glue beads indicating removable sections
Work slowly to avoid cracking the shell.
Remove Old Wheel Assembly
Once you’ve exposed the access panel, you can start removing the old wheel assembly by working from inside the shell so you don’t stress the outer surface. Use a screwdriver to unfasten screws, pry clips gently, and pull the axle free. Keep parts organized for reassembly.
| Part removed | Action required |
|---|---|
| Screw set | Unscrew, store |
| Clip/retainer | Pry gently |
| Axle/wheel | Pull straight |
Install Replacement Wheel
Start by lining up the new wheel assembly with the recessed housing so the axle sits squarely in its channel; you’ll avoid binding or wobble if the parts seat flush before you fasten anything.
Press snugly, insert screws, then test spin and clearance.
- Align axle and housing
- Finger-tighten screws first
- Torque evenly in a cross pattern
- Verify smooth rotation and no rub
Fix or Replace a Damaged Wheel Bracket
If the wheel bracket is bent, cracked, or pulling away from the luggage body, you can often fix it without replacing the whole case. Assess the damage, gather the right tools, and decide whether to repair the bracket with epoxy and reinforcement or swap it for a new one.
Remove fasteners, clean surfaces, clamp parts while adhesive cures, or unbolt and install a matching replacement bracket securely.
Address Wobbling Wheels With Shims or Bushings
Check the wheel shaft for side-to-side play to see how much shim or bushing you need.
Pick a shim that matches the axle diameter and material so it fits snugly without binding.
Slide it in and secure everything with a proper bushing or retaining clip to eliminate wobble.
Inspect Wheel Play
Before you replace parts, inspect the wheel play to determine whether wobble comes from loose bearings, a warped axle, or missing spacers; that lets you decide if adding thin shims or a bushing will stabilize the wheel without a full repair.
Check these steps and signs:
- Wiggle wheel for axial and radial movement
- Spin to detect rubbing or roughness
- Visually inspect spacer alignment
- Measure axle straightness and bearing fit
Choose Proper Shim
When wobble comes from loose spacing rather than damaged bearings, choose a shim or bushing that fills the gap snugly to restore axial alignment and prevent side-to-side play.
Measure gap thickness with calipers, pick a durable material (metal or nylon), and match inner diameter to the axle.
Test fit before reassembly; the shim should eliminate lateral movement without binding the wheel.
Secure With Bushing
1 simple bushing can stop a wheel from wobbling by filling the gap between the axle and wheel hub, keeping the wheel centered and turning smoothly.
You’ll press or slide the bushing into the hub, then secure the wheel onto the axle. Check alignment and tightness, spin to confirm smooth rotation.
- choose correct inner diameter
- trim for snug fit
- use durable material
- test under load
Lubricate Luggage Wheels Without Attracting Dirt
Want your wheels to roll smoothly without becoming dirt magnets? Use a dry, low-residue lubricant like silicone spray or a PTFE-based product sparingly.
Clean bearings and axle with a brush and isopropyl alcohol first, then apply a tiny drop to the rotating surfaces. Wipe excess immediately.
Recheck after a few trips and reapply minimally to prevent grime buildup.
Reinforce Weak Wheel Mounts With Epoxy or Plates
Keeping wheels rolling smoothly won’t help much if the mounts themselves are loose or cracked; reinforcing them with epoxy or metal plates can restore strength and extend the bag’s life.
You’ll clean, dry, and sand the area, then choose epoxy or a thin steel/aluminum plate and fasten securely.
- Clean and sand mount area
- Mix and apply epoxy carefully
- Clamp until cured
- Screw or rivet plate firmly
Patch Cracked Polycarbonate Around the Wheel
Patch small cracks in the polycarbonate shell around the wheel promptly to stop damage from spreading and to keep your luggage structurally sound.
Clean the area with isopropyl alcohol, sand lightly, and apply a thin layer of clear two-part epoxy or polycarbonate-specific adhesive.
Smooth with a plastic spatula, let cure fully, then sand and polish to restore contour and strength.
Use Zip Ties and Brackets as Temporary Fixes
If a wheel mount breaks while you’re traveling, zip ties and small metal brackets can make a surprisingly strong temporary fix. You’ll secure the wheel, restore basic mobility, and buy time until proper repairs.
Use durable ties, align brackets, tighten gradually, and test stability.
- choose heavy-duty zip ties
- use small L-brackets
- drill pilot holes if needed
- recheck before transit
Choose Universal Wheel Kits vs OEM Parts
Once you’ve jury-rigged a wheel to get home, you’ll need to decide whether to fit a universal wheel kit or hunt down OEM replacement parts.
Universal kits are cheaper, widely available, and fast to install, but may not match fit or durability.
OEM parts guarantee proper fit and longevity but cost more and take time.
Choose based on budget, urgency, and expected use.
Measure Luggage Wheels for Accurate Replacements
Before ordering replacements, measure each wheel precisely so you get parts that fit and roll true.
You’ll record wheel diameter, width, axle type, and bearing size before buying. Use calipers and note units; photograph measurements for reference.
Check wheel orientation and tread profile to match performance.
- Diameter
- Width
- Axle/boss type
- Bearing inner diameter
Find Compatible Replacement Wheels Online
After you’ve got precise measurements, start your search on reputable parts sites and major marketplaces where filters let you match diameter, width, axle type, and bearing inner diameter exactly.
Compare product photos, model compatibility notes, and seller return policies. Check user reviews for fit and durability feedback.
Save listings that match specs, note part numbers, and verify shipping times before purchasing.
What to Look for When Buying Replacement Wheels
When you shop for replacement wheels, focus on three essentials: dimensions that match your suitcase, the correct axle and bearing type for a secure fit, and materials that suit how you travel.
When replacing suitcase wheels, match dimensions, axle/bearing type, and durable materials for a secure, smooth ride.
Pick wheels that roll smoothly, resist abrasion, and match style. Check load rating and mounting pattern before buying.
- wheel diameter and width
- axle/bearing compatibility
- material (rubber, polyurethane)
- load capacity and rating
Align Axle and Housing: Step‑By‑Step Reinstall
Now that you have the replacement parts, check the axle alignment to make sure it runs straight through the wheel.
Seat the housing properly so the axle sits flush and the wheel spins freely.
Finally, secure the fasteners tight but don’t over-torque them to avoid stripping threads.
Check Axle Alignment
Before you slide the axle back into the housing, double-check that both the axle and wheel housing are clean, straight, and free of debris so the parts seat properly.
Then verify alignment before final fastening. Check these points:
- Visual straightness of axle and housing
- Smooth rotation without wobble
- Even gap on both sides
- Bearing or spacer seating uniformity
Seat Housing Properly
Seat the housing onto the wheel axle carefully, making sure the axle slides straight into the bore and the housing rests flush against the wheel hub; align the flats or keyways, feel for even contact all around, and stop immediately if you detect resistance or misalignment so you can correct it before fastening.
Hold parts steady, use light taps with a rubber mallet if needed, and recheck alignment visually and by rotating the wheel.
Secure Fasteners Tight
Once the axle and housing are aligned, secure the fasteners in a deliberate sequence so the housing stays flush and the wheel spins true; tighten progressively and check alignment after each turn.
You’ll:
- Hand-start all bolts to prevent cross-threading
- Tighten opposing bolts incrementally
- Use a torque wrench if specified
- Recheck spin and clearance, correcting as needed
Test Repaired Wheels Before Your Trip
When you finish the repairs, take the luggage for a short test run on the same surfaces you’ll use while traveling to confirm the wheels roll smoothly, steer properly, and don’t wobble.
Push, pull, turn corners, and apply light load to check balance and alignment.
Listen for unusual noises, feel for resistance, and repeat adjustments if anything feels off before you pack.
Preventive Maintenance: Clean, Tighten, Lubricate
Keep your wheels rolling reliably by cleaning, tightening, and lubricating them regularly. You’ll prevent corrosion and reduce wear when you:
- Wipe away dirt and hair from axle and bearings.
- Inspect and tighten loose screws or nuts.
- Apply a drop of light oil to bearings.
- Spin wheels to confirm smooth movement.
Do this every few months or before trips to keep performance reliable.
Common Mistakes That Make Wheel Problems Worse
Regular cleaning and lubrication will stop most problems, but some habits actually make wheel issues worse. You shouldn’t ignore loose screws, force stuck wheels, or skip inspections after trips. Avoid cheap replacements and overloading bags. Check causes early and act calmly.
| Mistake | Why it worsens | Quick fix |
|---|---|---|
| Forcing | Breaks axle | Inspect |
| Ignoring | Wear accumulates | Tighten |
Real Fixes: Carry‑On vs Checked‑Bag Wheel Issues
Carry‑ons and checked bags face different stresses, so you’ll want different fixes: carry‑on wheels usually suffer from impact and debris and are best repaired quickly with tightening, cleaning, or wheel swaps, while checked‑bag wheels often have broken axles or cracked housings that need stronger parts or professional repair.
- Inspect for loose fasteners
- Clean debris and lubricate
- Replace small wheels or casters
- Reinforce cracked housings
When to Call a Professional Repair Service
If a wheel’s axle is bent, the housing is cracked, or you can’t reliably roll the bag, call a professional repair service—these problems usually need specialized tools, replacement parts, or welding that DIY fixes won’t address.
You should also seek pros when repairs affect structural integrity, involve sealed bearings, or when you’re short on time.
Ask about warranties, turnaround, and part authenticity before approving work.
DIY Cost vs Buying New Luggage: Quick Comparison
When you weigh the costs, repairing a broken wheel yourself usually saves money for simple fixes—replacement wheels, screws, or lubricant often run $10–$40 and take under an hour—while buying a decent new suitcase typically costs $60–$200 or more.
Choose DIY when parts and your time are cheap, and opt for replacement when damage is extensive or the bag’s value is low.
- Parts: $10–$40
- Time: <1 hour
- Complexity: low vs high
- Longevity: patch vs new
Warranty, Airline Damage, and Repair Policies
Although you might prefer fixing a wheel yourself, check your luggage’s warranty and the airline’s damage policy first, because they can cover repairs or replacements that save you time and money.
Contact the manufacturer with serial and purchase info, document damage with photos, and file airline claims promptly.
Know time limits, proof requirements, and whether repair centers or vouchers are offered before you proceed.
Eco‑Friendly Disposal and Recycling of Old Wheels
When a wheel’s beyond repair, check local recycling centers or municipal programs to see if they accept rubber, plastic, or metal components.
You can also repurpose parts—bearings as hardware, wheels as casters for DIY projects—rather than tossing them.
If components contain oils, batteries, or other hazardous materials, take them to a designated disposal site to avoid contamination.
Local Recycling Options
If you’re ready to ditch old luggage wheels responsibly, start by checking nearby recycling centers and municipal waste programs that accept hard plastics and small metal parts.
You can also contact specialty e‑waste or metal recyclers, drop off at community collection events, or ask thrift shops about accepting undamaged components.
- Local recycling centers
- Municipal bulky waste programs
- Metal/scrap recyclers
- Community collection events
Repurposing Wheel Components
Beyond drop‑offs and scrap yards, you can give old wheels a new life by repurposing their components for practical projects.
Remove bearings, axles, and rubber treads to use as drawer sliders, cabinet rollers, or protective bumpers.
Mount wheels as casters on storage boxes, craft tool organizers from rims, or fashion garden markers.
Label parts and share leftovers with makers or community workshops.
Proper Hazardous Disposal
Many old luggage wheels contain materials you shouldn’t toss in regular trash, so you’ll want to handle disposal carefully to protect the environment and comply with local rules.
Recycle, donate, or dispose hazardous parts properly. Follow these steps:
- Separate rubber, metal, and plastic components.
- Check local e‑waste or hazardous waste guidelines.
- Use recycling centers or mail‑back programs.
- Label parts if required.
Travel Repair Kit Checklist for Luggage Wheels
One compact kit can save your trip when a wheel fails, so pack a few essentials that let you fix common problems on the go.
Include a multi-bit screwdriver, small wrench set, spare wheel or caster, replacement axle pins, zip ties, super glue, lubricant, needle-nose pliers, and a roll of strong tape.
Keep items in a labeled pouch.
Frequently Asked Questions
Can I Replace Luggage Wheels With 3d‑Printed Replicas?
Yes — you can replace luggage wheels with 3D‑printed replicas, but you’ll need durable filament (PETG or nylon), accurate measurements, metal axles/bearings, and proper printing settings; test fit and load capacity before travel to avoid failures.
Will Wheel Repairs Void My Suitcase Warranty?
It depends—you’ll void warranty if repairs violate the terms, like using nonapproved parts or altering structure. Check your warranty’s exclusions, contact the manufacturer first, and keep receipts or use authorized repair to avoid nullifying coverage.
Can Shampoo or Soap Residue Cause Spinner Failure?
Yes — shampoo or soap residue can cause spinner failure by attracting grime, gumming bearings, and reducing wheel rotation. You’ll need to clean thoroughly, flush residues, and lubricate properly to restore smooth movement and prevent damage.
Are There Airline Rules for Repairing Wheels at the Gate?
Yes — you can’t perform major repairs at the gate, but you can make minor, quick fixes. Airlines allow temporary adjustments; they’ll refuse tools or actions that delay boarding or compromise safety. Ask staff before starting.
How Do I Dispose of Metal Axles and Bearings Responsibly?
You should recycle metal axles and bearings at a scrap metal or municipal recycling center; don’t toss them in regular trash. Clean off grease, separate materials, and ask about hazardous-waste drop-offs if contaminated; many centers accept them.
Conclusion
You’ve got options: quick fixes can get you rolling through an airport, while full replacements give long-term reliability. Diagnose by rolling, wiggling, and inspecting; measure axle size and wheel type before buying parts. Use on‑the‑road fixes for emergencies, weigh DIY cost against new luggage, and check warranties or airline repair options. Recycle old wheels responsibly, and pack a compact repair kit so a minor problem never ruins your trip.